Making chat with emojis in Gameface
5/30/2024
Kaloyan Geshev
Creating a chat in Gameface is a straightforward process, thanks to the built-in support for websockets. This is especially true when utilizing a library like socket.io . We have a topic in our documentation that explains how the official socket.io chat sample works seamlessly in Gameface.
1/28/2025 Update
In version 1.61, Gameface adds support for certain types of emoji fonts. As this tutorial shows how to do chat emojis with SVG you may also want to know how to do it with an emoji font instead. You can check the guide inside the Emoji support news page for further information.
Showcase overview
In this showcase, we have enhanced the socket.io chat sample by adding several features:
- A scrollable container for messages, using the Gameface scrollable-container component , as Gameface does not natively support a scroll slider.
- Connect and disconnect user messages displayed in the chat.
- Timestamps for all messages.
- Displaying the user ID for incoming messages.
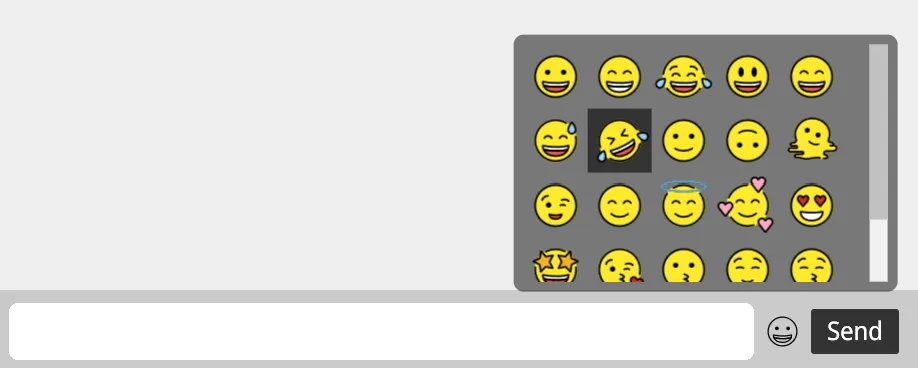
- A panel for sending emojis in the chat.
This sample focuses on how to send and show emojis in the chat, as Gameface does not currently support OS emojis natively. And it has the added bonus of allowing you to use your own custom emojis. One straightforward method is to use SVG emojis. For this sample, we used a small set of SVG emojis from OpenMoji to demonstrate the simplest way of adding emoji support to a chat in Gameface.
Source location
You can review the complete sample source within the ${Gameface package}/Samples/uiresources/UITutorials/ChatEmojis directory.
To run the sample, follow these steps:
- Do
npm iin this directory. - Run the chat server by executing
node server.jsin this directory. - Open two or more instances of Gameface and chat between them.
Sample specifics
Chat messages container and buttons
We followed the socket.io sample to create the messages container and the send button. We then enhanced it by adding scroll functionality to the messages container using the gameface-scrollable-container and included a button for toggling the emoji panel.
1<gameface-scrollable-container2 automatic3 class="messages-container"4>5 <component-slot data-name="scrollable-content">6 <ul id="messages"></ul>7 </component-slot>8</gameface-scrollable-container>9<form10 id="form"11 action=""12>13 <input14 id="input"15 autocomplete="off"16 />17 <div class="chat-buttons">18 <button class="open-emojis-panel-btn"></button>19 <button class="send-btn">Send</button>20 </div>21</form>
Sending messages
To send the text typed in the chat input to the server, an event is emitted when the Send button is clicked or when the Enter key is pressed while the input is focused.
1const socket = io();2
3document.querySelector('.send-btn').addEventListener('click', () => {4    if (input.value) {5        socket.emit('chat message', input.value);6        input.value = '';7    }8});9
10input.addEventListener('keydown', (event) => {11    if (event.keyCode === 13 && input.value) {12        socket.emit('chat message', input.value);13        input.value = '';14    }15});
After the server processes the message, it emits an event to all connected users, updating their chat UI. Check the next section for details.
Receiving messages
Receiving messages from the server on the front end involves subscribing to a socket event:
1socket.on('chat message', ({ msg, id }) => {2    const item = document.createElement('li');3    if (id === socket.id) item.classList.add('right');4
5    item.innerHTML = (id !== socket.id ? `<div class="user-id">${id}</div>` : '') + msg;6    messages.appendChild(item);7
8    if (id === socket.id) {9        waitForFrames(() => messagesContainer.onScrollSlider({ detail: { handlePosition: 100 } }), 7);10    }11});
This code creates a new list element to hold the message from the server, including the user ID if the message is from another user.
The element is appended to the messages container, and if the message is from the current user, the scrollable container scrolls to the bottom.
1if (id === socket.id) {2 waitForFrames(() => messagesContainer.onScrollSlider({ detail: { handlePosition: 100 } }), 7); // Scrolls the slider and container to 100% where the last message is3}Know issue: There is a need to wait for 7 frames to ensure the scrollable container correctly scrolls to the last message. The scrollable container automatically resizes when a new list element is appended, which takes about 6 frames.
Without waiting, the container might not scroll properly.
The waitForFrames function is defined as follows:
1function waitForFrames(callback, frames) {2 if (frames === 0) return callback();3 frames--;4 requestAnimationFrame(() => this.waitForFrames(callback, frames));5}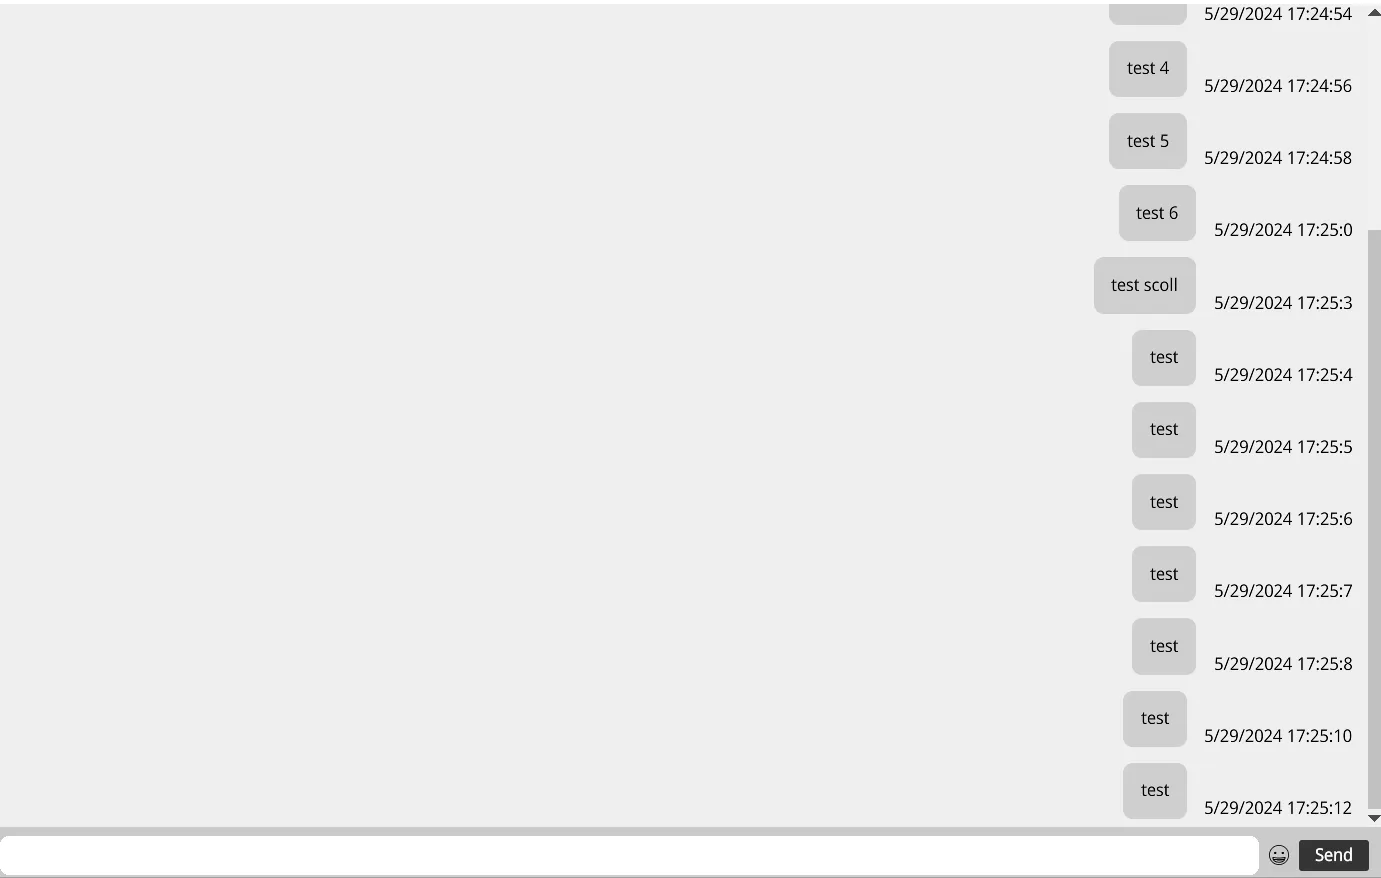
Server
On the server side, messages sent from the front end are processed by listening for socket events.
1const express = require('express');2const app = express();3const http = require('http');4const server = http.createServer(app);5const { Server } = require("socket.io");6const io = new Server(server);7
8io.on('connection', (socket) => {9    socket.on('chat message', (msg) => {10        const d = new Date();11        const timeStamp = [d.getMonth() + 1, d.getDate(), d.getFullYear()].join('/') + ' ' + [d.getHours(), d.getMinutes(), d.getSeconds()].join(':');12
13        io.emit('chat message', { msg: `<div class="message">${msg}</div><div class="timestamp">${timeStamp}</div>`, id: socket.id });14    });15});
A timestamp is generated for each message. The server then emits an event to the front end with the processed message in HTML format, along with the sender’s ID.

Chat emojis - Model
To simplify the instantiation of all emojis in a panel, we defined an array as a Gameface data binding model. Leveraging Gameface’s data binding , we can easily iterate over this model and display the emojis in the HTML page.
The model is structured as follows:
1const emojis = [2 '/assets/emojis/1F600.svg',3 '/assets/emojis/1F601.svg',4 '/assets/emojis/1F602.svg',5 ...6];Chat emojis (FE) - Emojis panel
We added a button to the right of the chat input that opens a panel with all supported chat emojis, allowing users to add emojis to their messages before sending them. Selecting an emoji from the panel inserts its code into the message input, surrounded by colons. For example, :1:.
The panel was created using the gameface-tooltip component to wrap the emojis in a panel, and the gameface-scrollable-container component to enable scrolling if the emojis overflow the panel.
1<gameface-tooltip2 class="emojis-panel"3 target=".open-emojis-panel-btn"4 on="click"5 off="click"6 position="top"7>8 <div slot="message">9 <gameface-scrollable-container10 class="emojis-container"11 automatic12 >13 <component-slot data-name="scrollable-content">14 <div15 class="emoji emoji-btn"16 data-bind-for="index,iter:{{emojis}}"17 >18 <div19 data-bind-click="addEmoji({{index}})"20 class="emoji-svg"21 data-bind-style-background-image-url="{{iter}}"22 ></div>23 </div>24 </component-slot>25 </gameface-scrollable-container>26 </div>27</gameface-tooltip>Here, we use data binding to render the emoji SVGs in the panel with data-bind-style-background-image-url="{{iter}}", which sets the background of the div to the emoji URLs from the model.
Note: The tooltip might not be positioned correctly as its target is at the bottom right of the page. To fix this, override the tooltip’s transform property:
1.emojis-panel {2 ...3 transform: translateX(-70%) translateY(-105%) !important;4 ...5}Chat emojis (BE) - Resolving emojis
When a message is received on the server, any emoji codes in the message should be resolved. To achieve this, extend the source in the Server section.
1const emojis = require('./src/emojisMapServer');2
3io.on('connection', (socket) => {4    socket.on('chat message', (msg) => {5        const newMessage = msg.replace(/:[0-9]*:/g, (match) => {6            const emojiCode = match.replace(/:/g, ''); // Retrieve the emoji code between the : symbols. For example, :1: corresponds to the emoji with index 1 in our array of emoji URLs.7            return `<img class="emoji" src="${emojis[emojiCode]}"/>`;8        });9
10        const d = new Date();11        const timeStamp = [d.getMonth() + 1, d.getDate(), d.getFullYear()].join('/') + ' ' + [d.getHours(), d.getMinutes(), d.getSeconds()].join(':');12
13        io.emit('chat message', { msg: `<div class="message">${newMessage}</div><div class="timestamp">${timeStamp}</div>`, id: socket.id });14    });15});
Here, newMessage contains the processed message with all emoji codes replaced by img elements with the corresponding emoji SVG URLs from the emojis map.
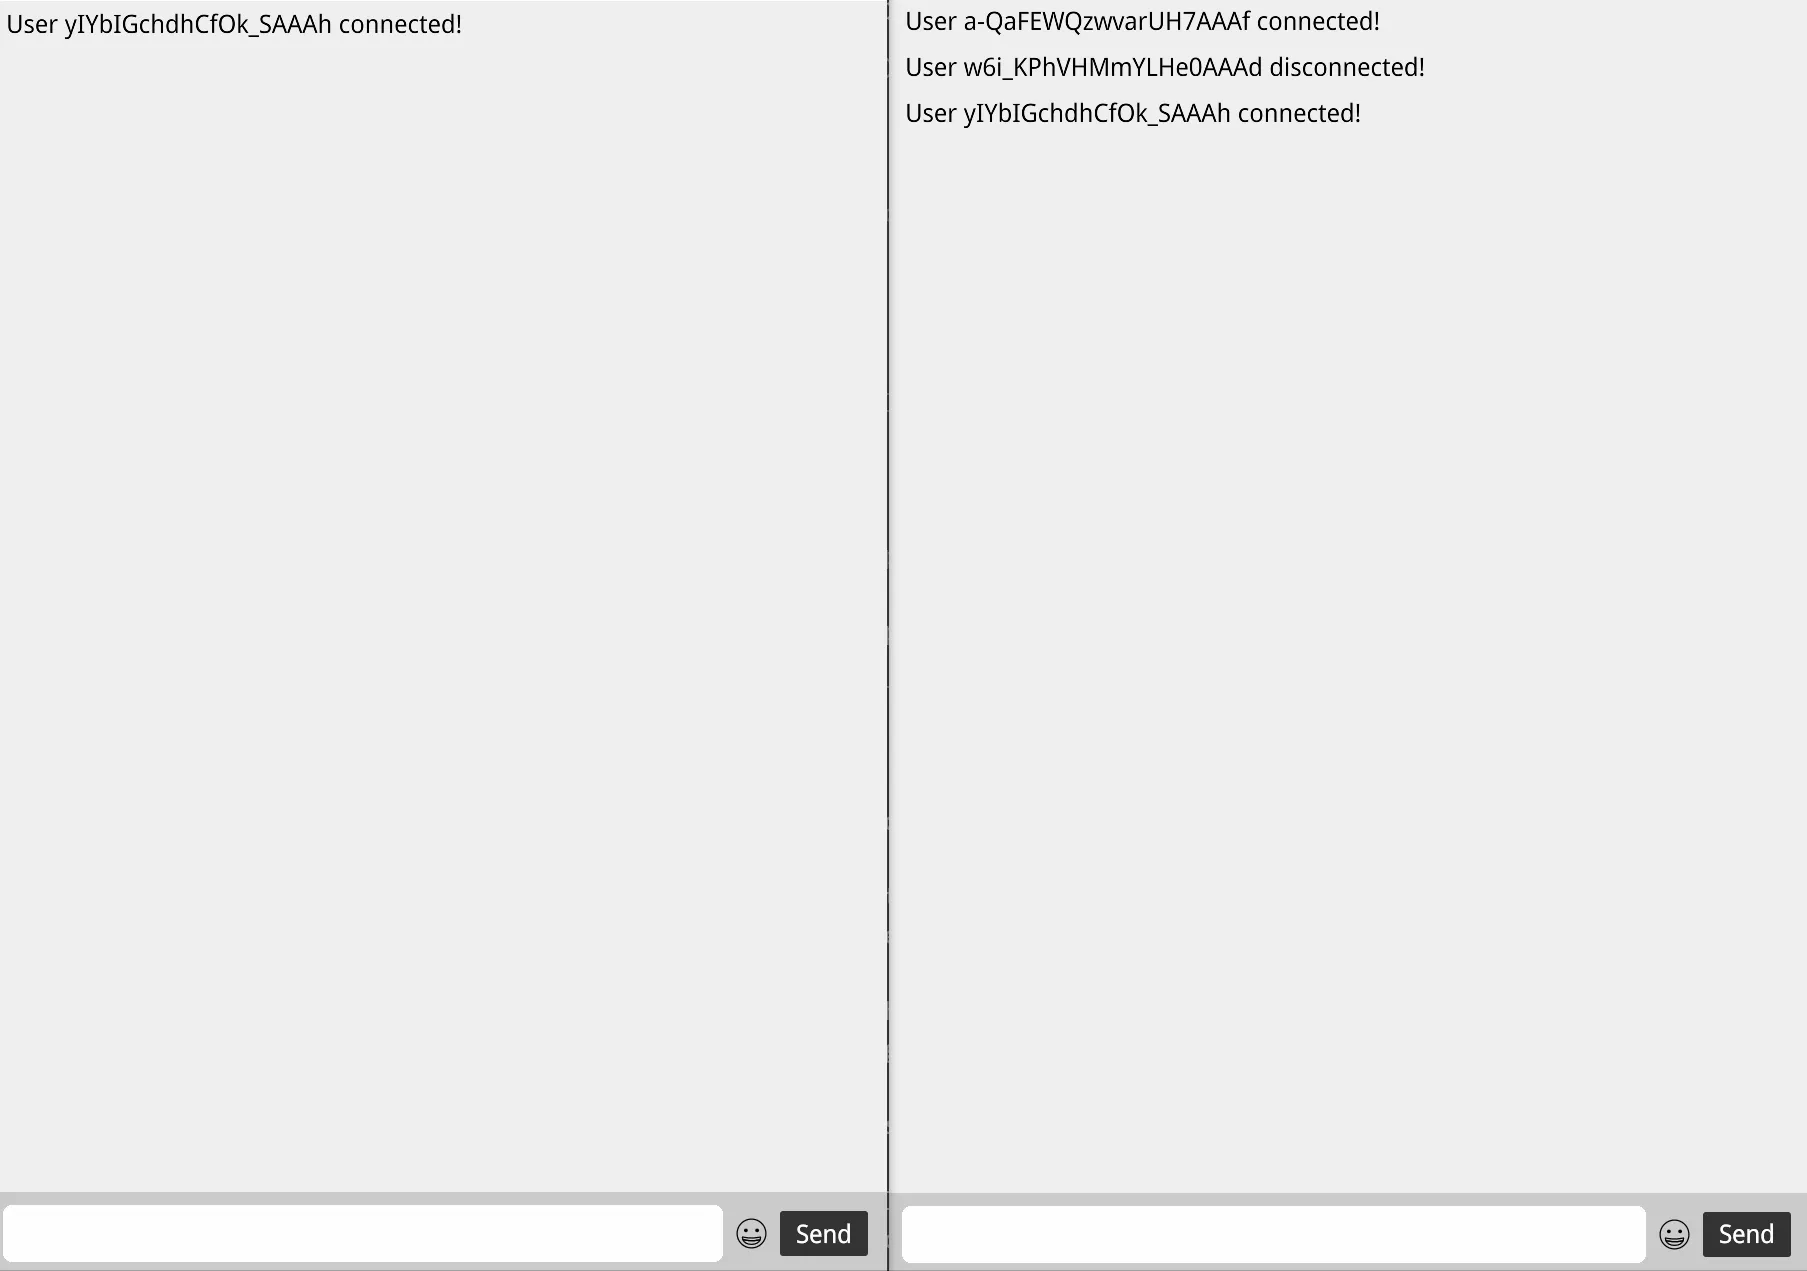
Chat user connected and disconnected
Additionally, we added messages indicating when a user connects or disconnects from the chat.
This is easily handled on the server side:
1io.on('connection', (socket) => {2    io.emit('user connected', socket.id);3
4    ...5
6    socket.on('disconnect', () => {7        io.emit('user disconnected', socket.id);8    });9});
On the front end, we handle the emitted events by subscribing to the user connected and user disconnected events and reading the user ID:
1function setUserState(id, connected) {2    const item = document.createElement('li');3    item.textContent = `User ${id} ${connected ? 'connected' : 'disconnected'}!`;4    messages.appendChild(item);5}6
7socket.on('user connected', (id) => setUserState(id, true));8socket.on('user disconnected', (id) => setUserState(id, false));
For each connection or disconnection, we append a list item to the messages container.
Styles
To check the chat styles, refer to the ${Gameface package}/Samples/uiresources/UITutorials/ChatEmojis/styles.css file.