In-world hologram UI - Showing an in world screen with a message (Part 2)
1/7/2025
Kaloyan Geshev
In this tutorial, we will continue building our game with in-world hologram elements.
You can find the rest of the Hologram UI series here.
Showcase Overview
In this part, we’ll add an in world screen on top of the box created in the previous tutorial. This screen will display a message indicating that the player can access their inventory when near the box. Additionally, we’ll add smooth transitions to the UI - the screen will close when the player opens their inventory by pressing the P key and reopen when the inventory is closed. However, the backend implementation of this functionality will be covered in the next tutorial and in this one we will focus on the UI.
Adding an in-world view
To begin, we’ll add an in-world UI. Since we’ll use multiple in-world views (e.g., the current one and a 3D player inventory menu), it’s more efficient to create a separate Blueprint class for each view rather than adding them directly via the Gameface plugin menu’s Add In-World UI option, as described in the documentation here .
Creating the In-World Plane
- Locate the
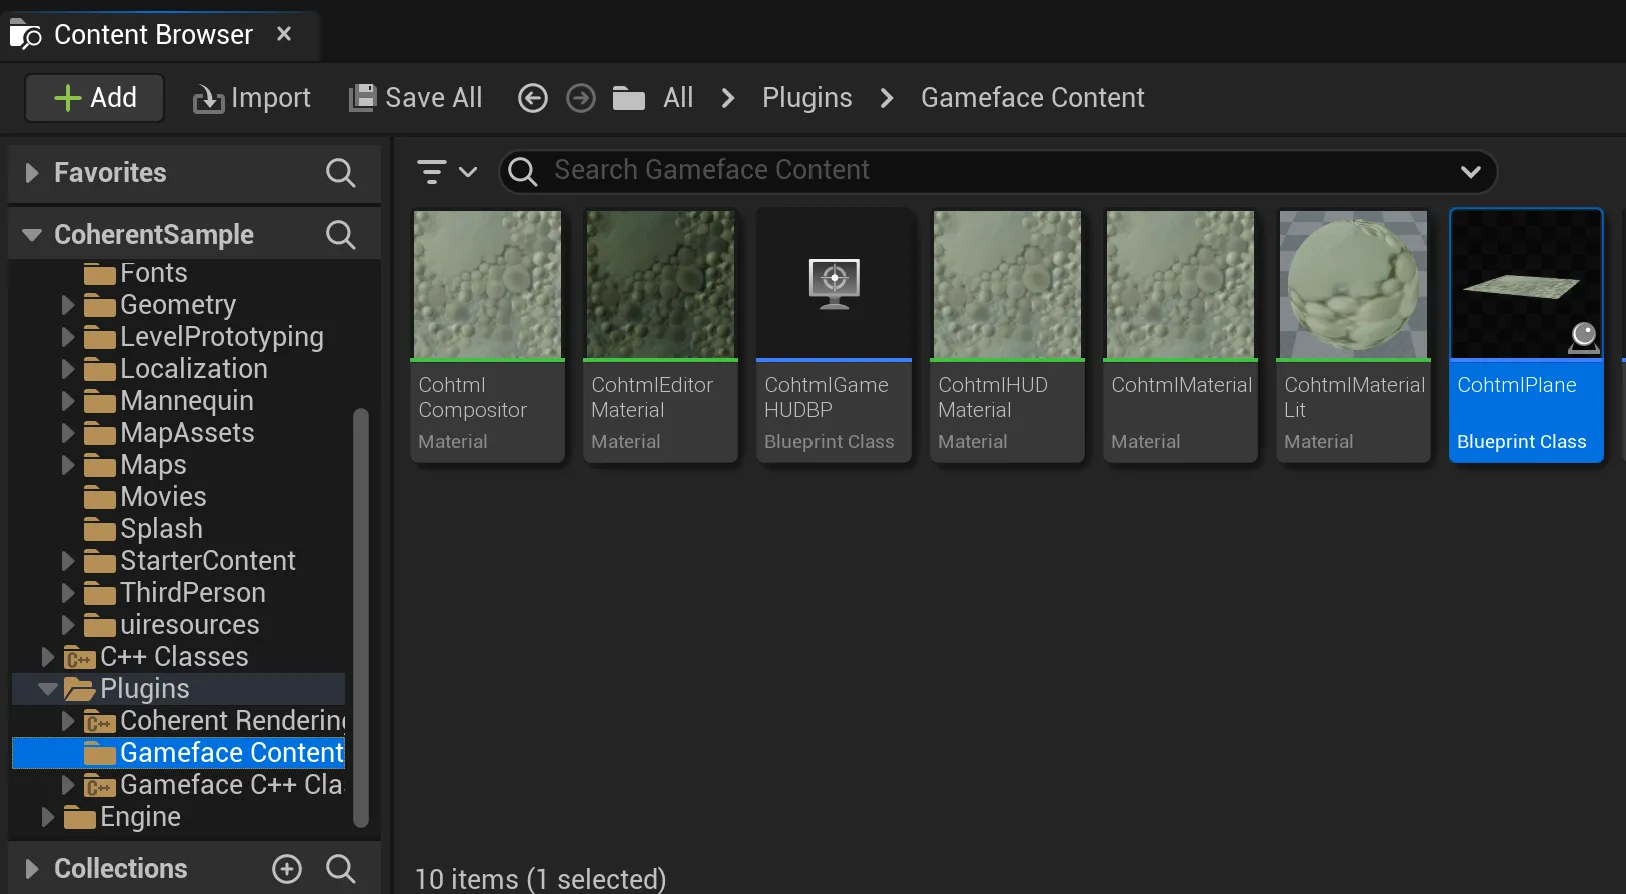
CohtmlPlaneclass inContent/Plugins/Gameface Contentusing the Content Browser.
Note: If the CohtmlPlane class isn’t visible, first use the Add In-World UI option in the plugin to generate the class.
- Duplicate the
CohtmlPlaneclass and rename itInWorldPlanefor this tutorial.
- Drag and drop the
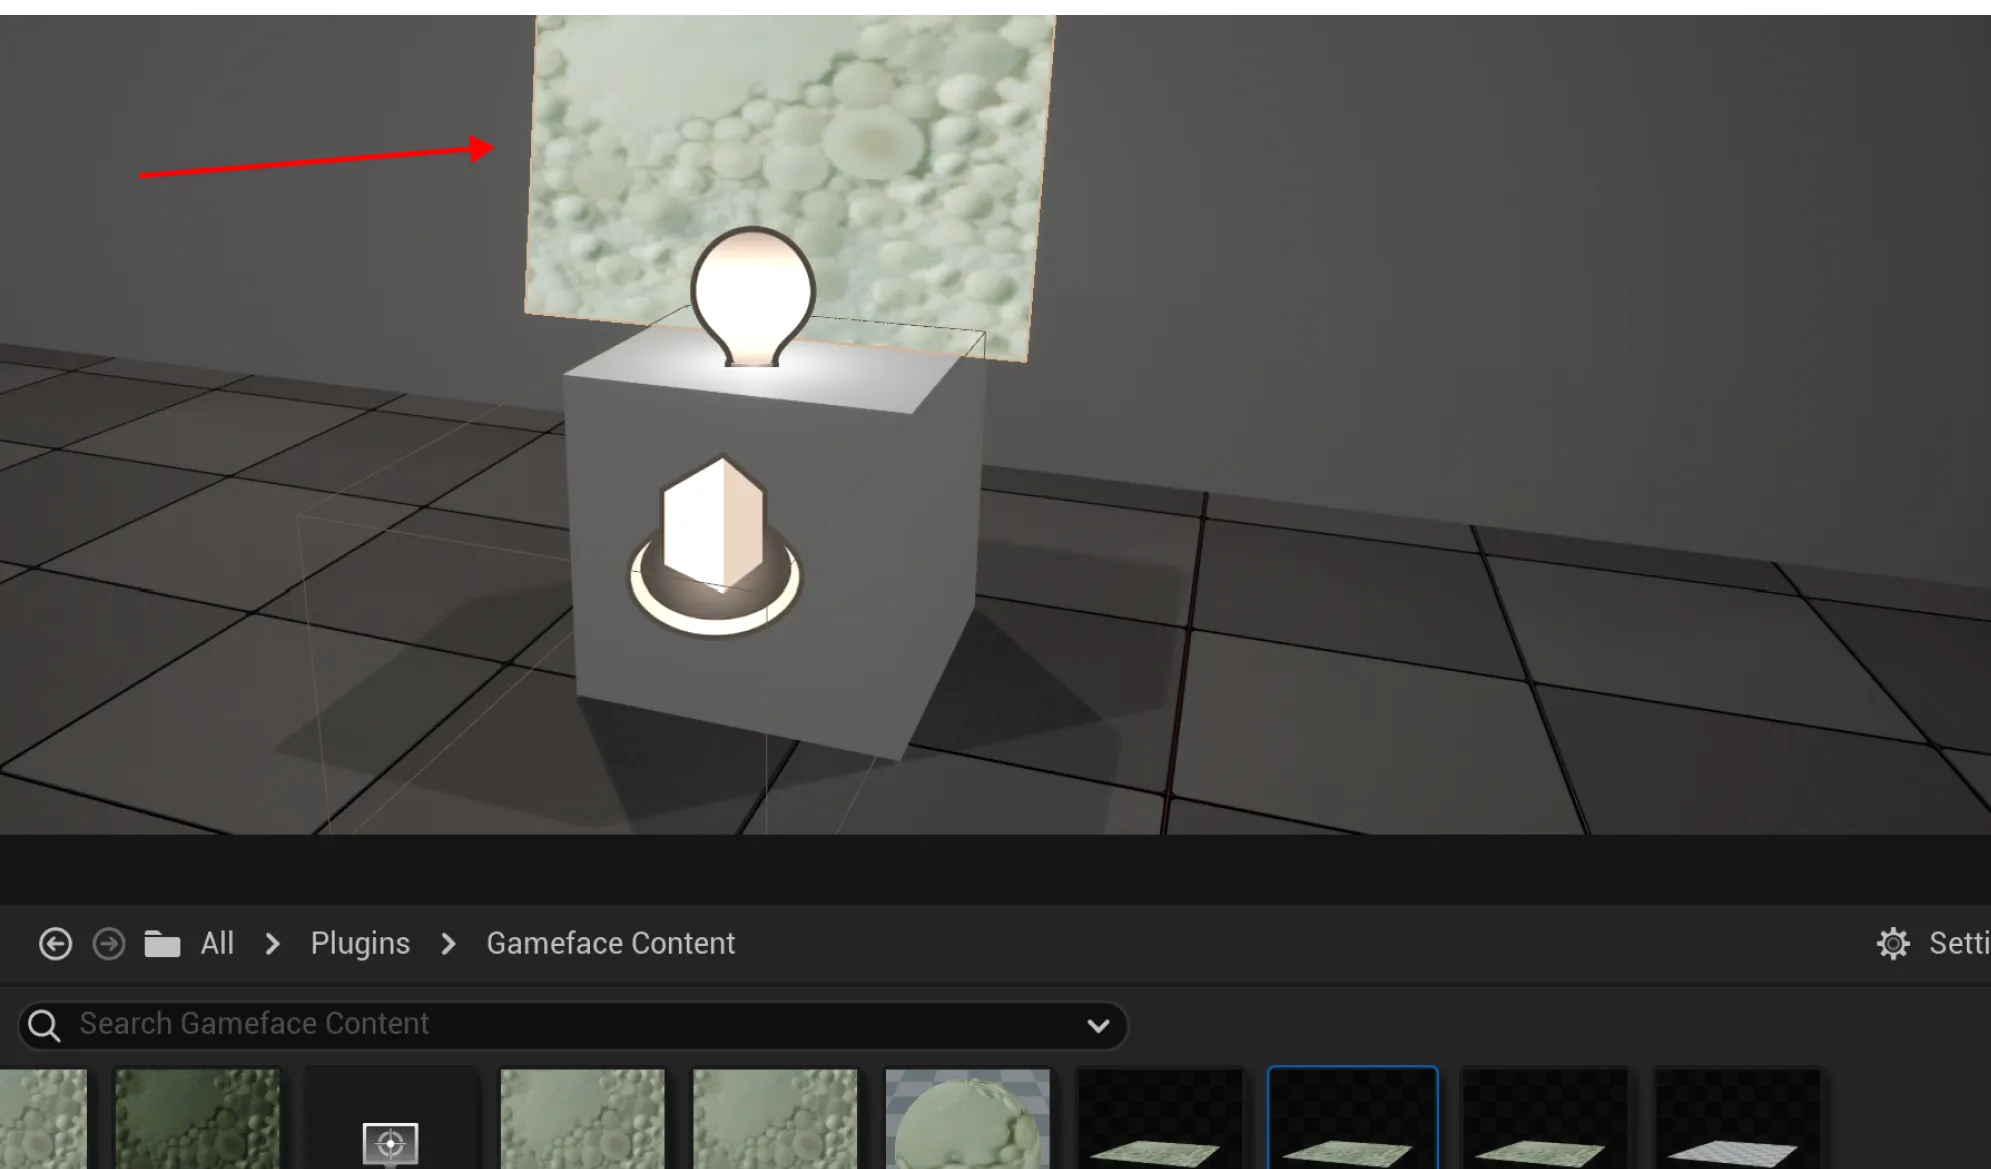
InWorldPlaneBlueprint class into the world and position it on top of the box.
Setting Up the In-World Plane
-
Open the
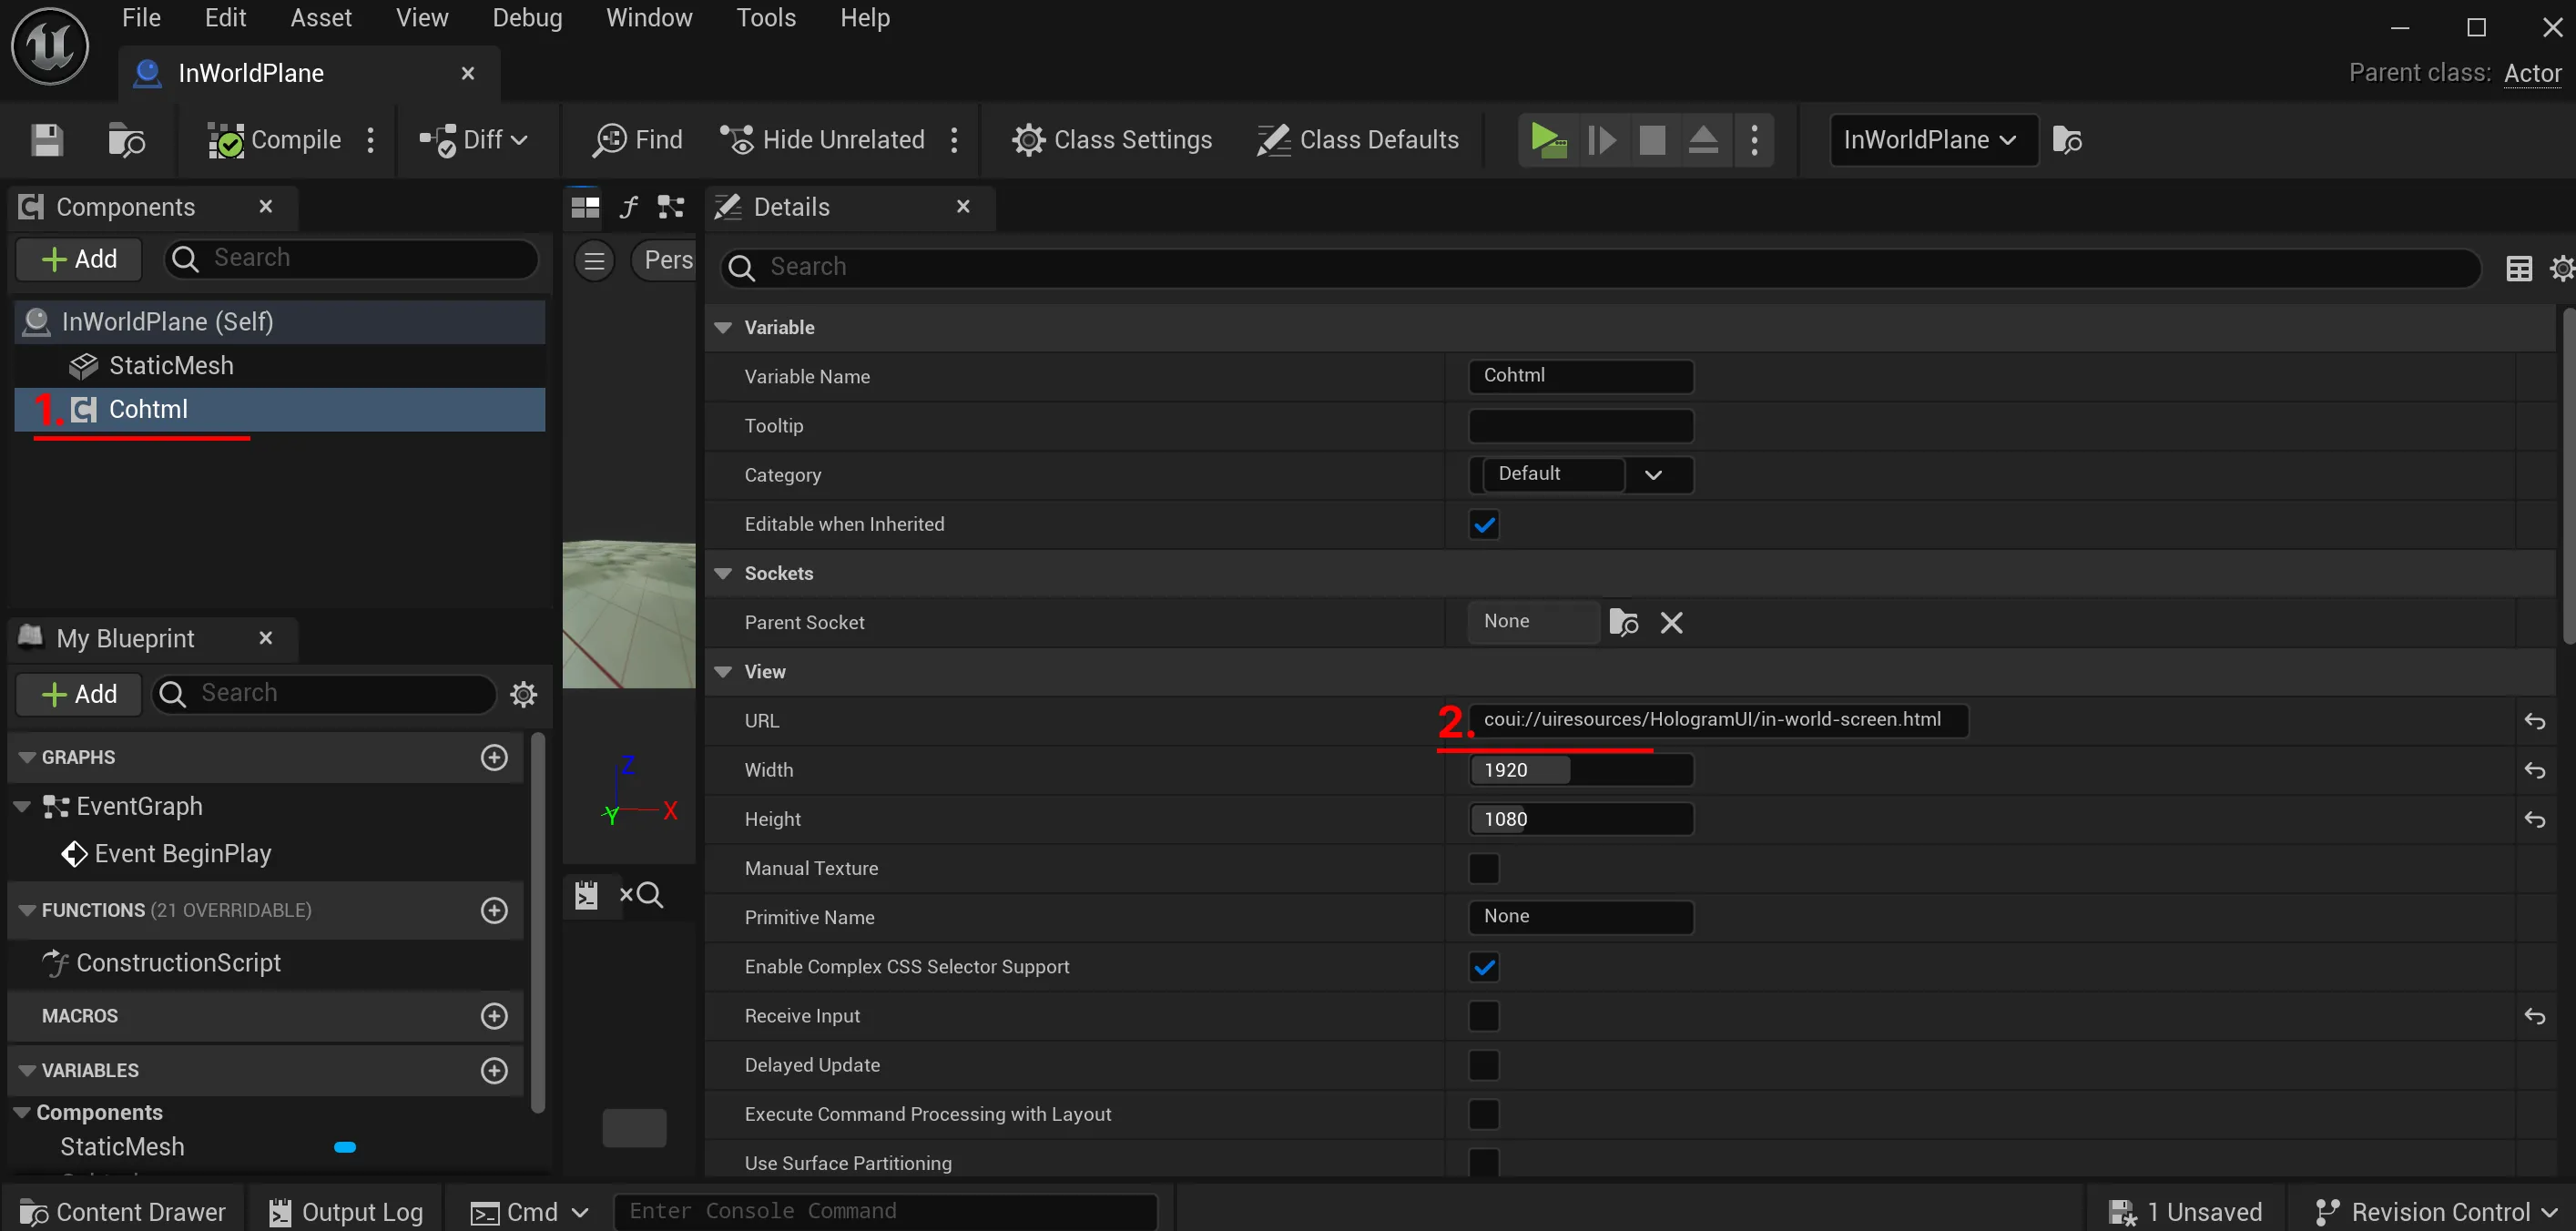
InWorldPlaneBlueprint class and access theDetailspanel. -
Select the
Cohtmlcomponent and change the URL tocoui://uiresources/HologramUI/in-world-screen.html.
- Disable game input for the in-world view - in the
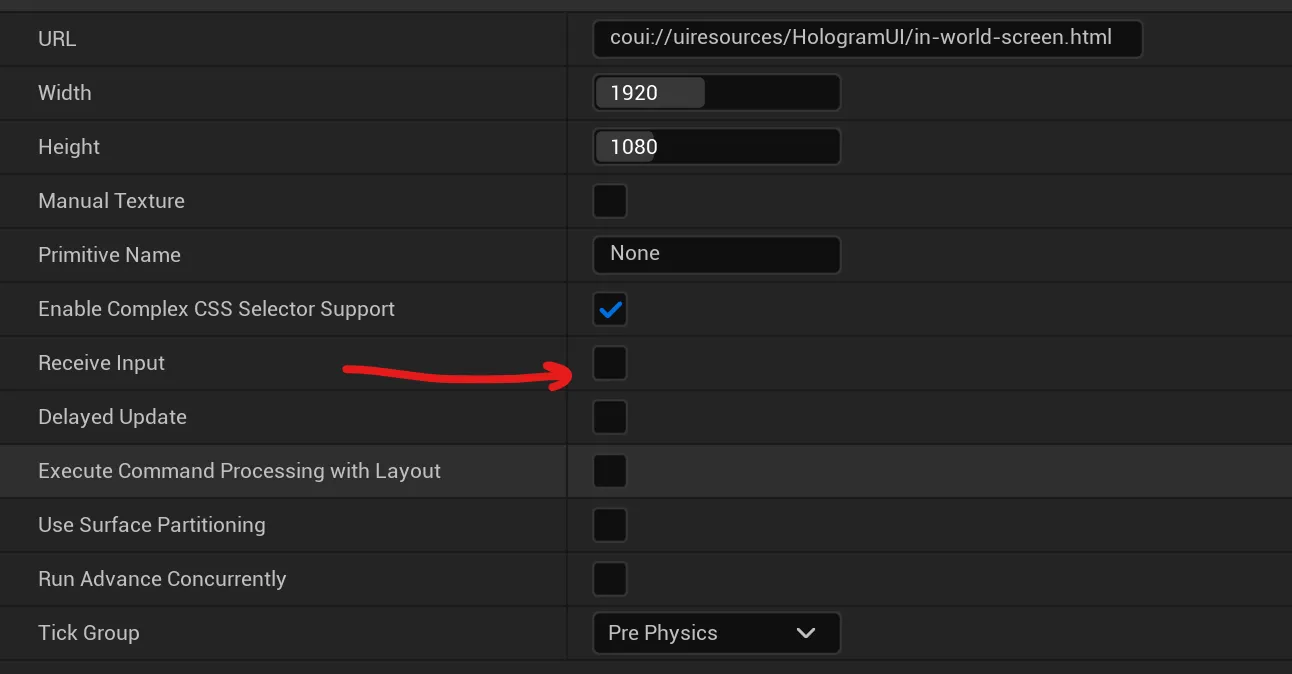
Cohtmlcomponent, uncheck theReceive Inputoption.
With this setup, the UI from the in-world-screen.html page will render on the plane above the box.
Remove collision from the in world view
To allow the player to pass through the in-world view, remove its collision:
- Open the
InWorldPlaneBlueprint class and access the Details panel. - Select the
StaticMeshcomponent. - Search for
Collisionand setCollision PresetstoNo Collision.
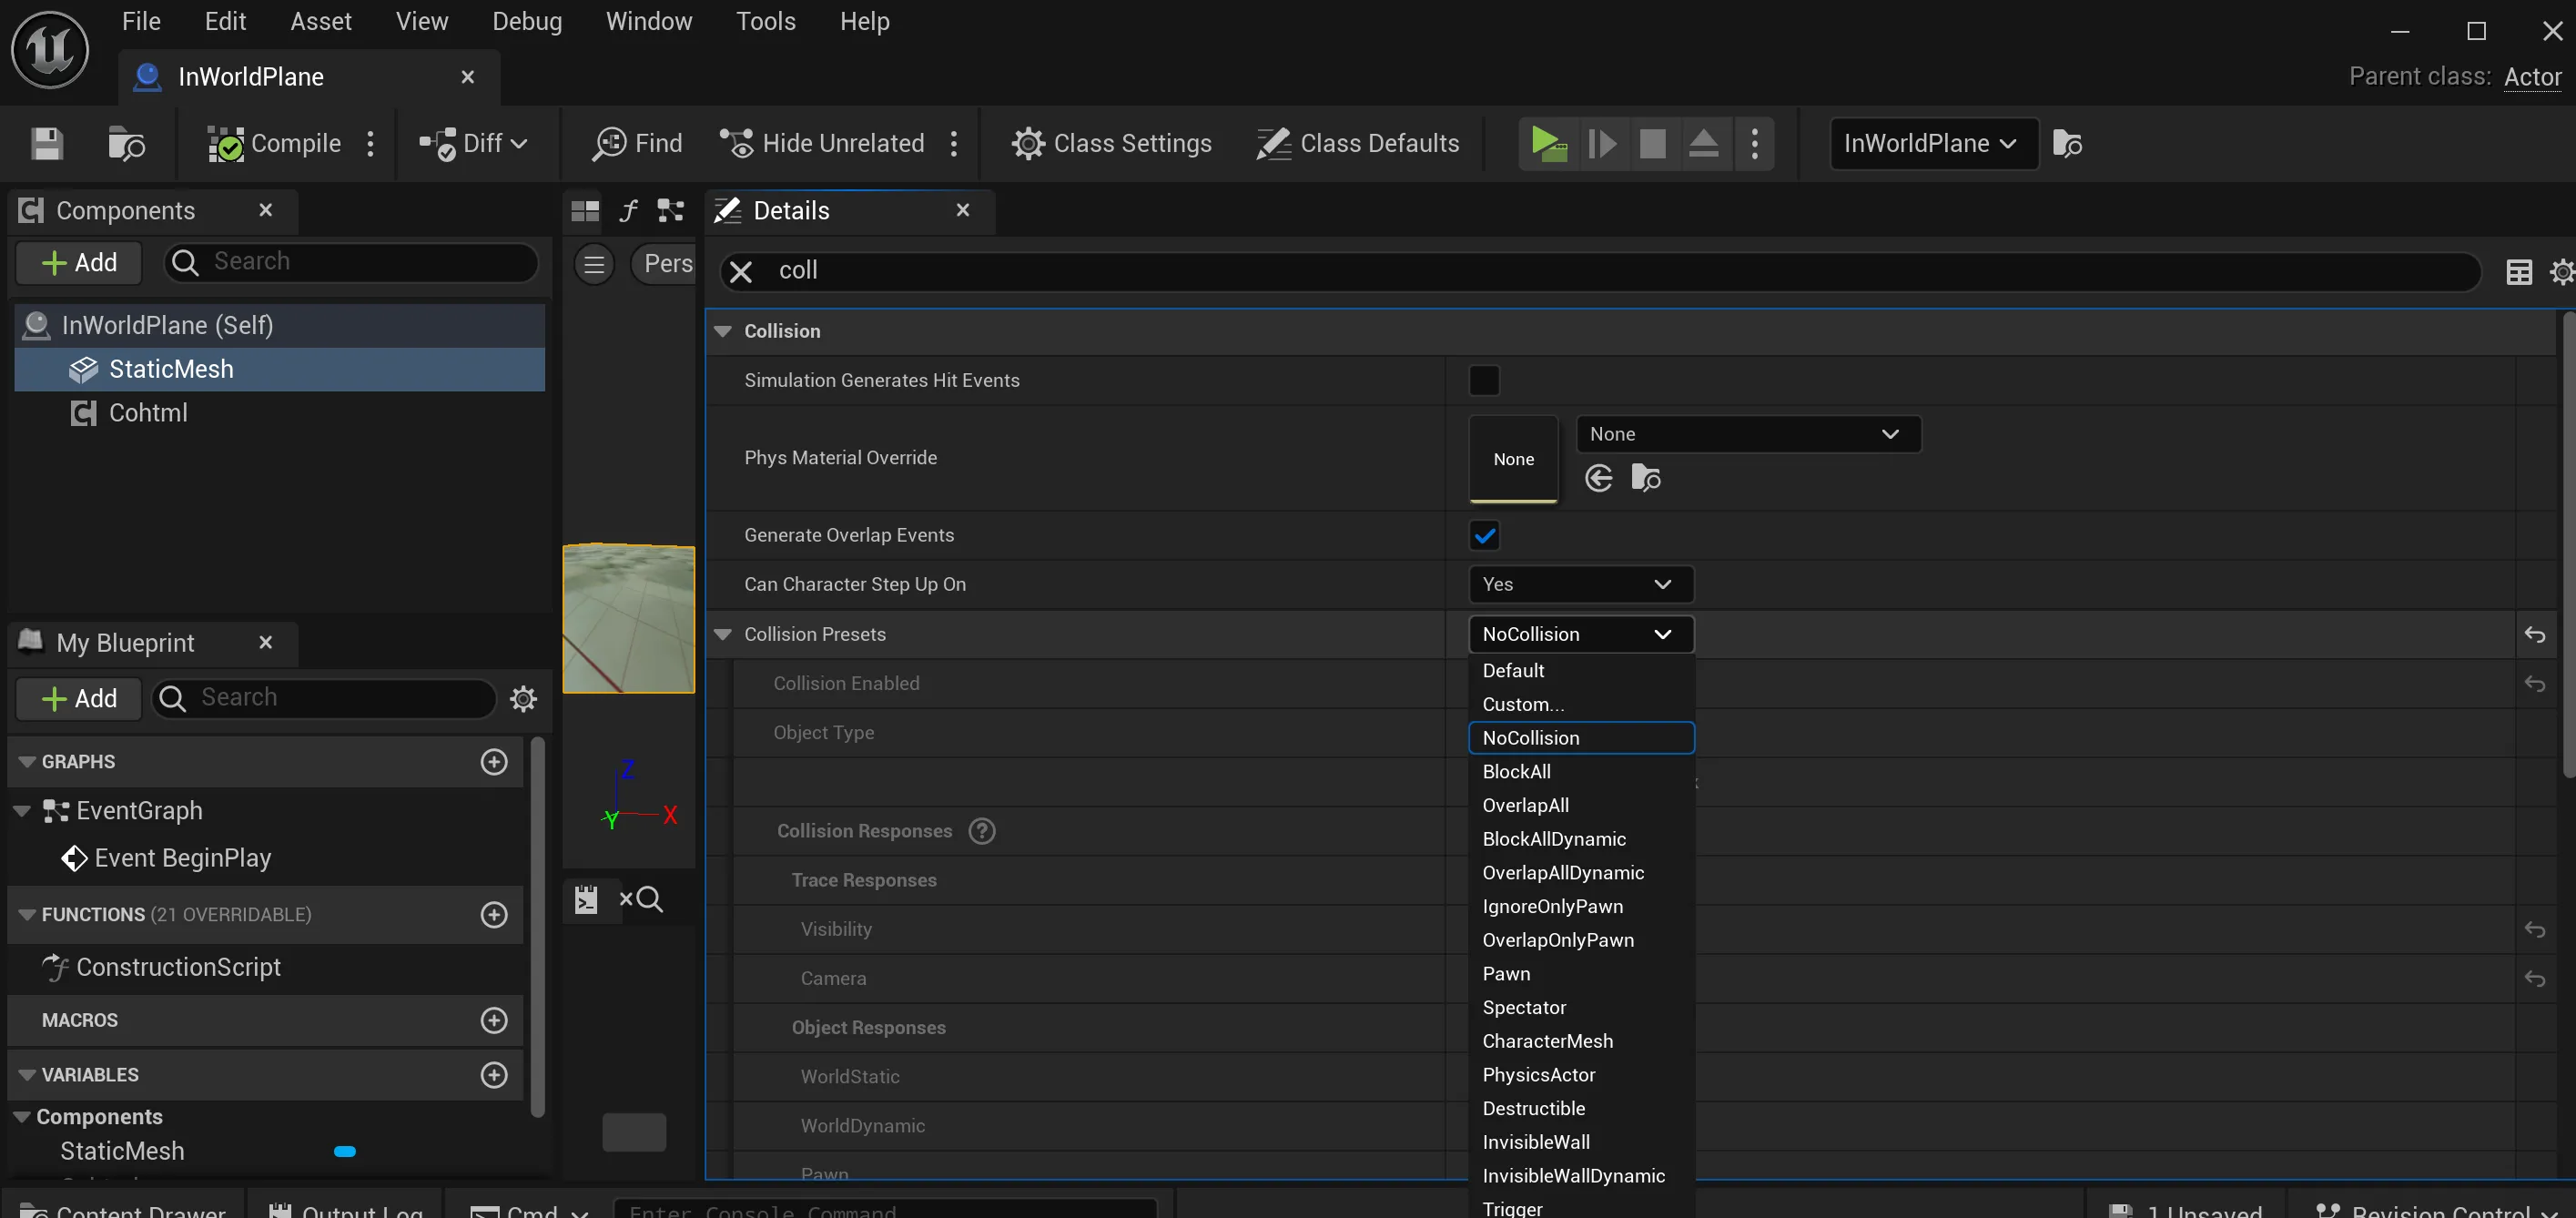
After changing this, the player will be able to walk through the plane, as shown below:
Make in-world view accessible in the level blueprint
To program the behavior of the in-world view, we’ll make it accessible within the Level Blueprint:
- Extend the
InitVariablesmethod created in the previous tutorial here. - Create a new variable in the Level Blueprint:
2.1. Name:
In World Screen2.2. Type:Gameface Component - Set the variable:
- Use the
Get All Actors of Classnode withActor Classset toInWorldPlane. - Retrieve the first item from the results.
- Access the
Cohtmlcomponent of the retrieved actor and assign it to theIn World Screenvariable.
- Use the
Begin Object Class=/Script/BlueprintGraph.K2Node_FunctionEntry Name="K2Node_FunctionEntry_1" ExportPath="/Script/BlueprintGraph.K2Node_FunctionEntry'/Game/Maps/SampleMaps/HologramUI.HologramUI:PersistentLevel.HologramUI.InitVariables.K2Node_FunctionEntry_1'"
   ExtraFlags=201457664
   FunctionReference=(MemberName="InitVariables")
   bIsEditable=True
   NodePosX=784
   NodeGuid=431D04A94D6C54F035BD8E8CCE0E07A4
   CustomProperties Pin (PinId=897139344AE0619E4E9EAE9062F7D050,PinName="then",Direction="EGPD_Output",PinType.PinCategory="exec",PinType.PinSubCategory="",PinType.PinSubCategoryObject=None,PinType.PinSubCategoryMemberReference=(),PinType.PinValueType=(),PinType.ContainerType=None,PinType.bIsReference=False,PinType.bIsConst=False,PinType.bIsWeakPointer=False,PinType.bIsUObjectWrapper=False,PinType.bSerializeAsSinglePrecisionFloat=False,LinkedTo=(K2Node_CallFunction_2 7603443946BC97914116B090DA7911A6,),PersistentGuid=00000000000000000000000000000000,bHidden=False,bNotConnectable=False,bDefaultValueIsReadOnly=False,bDefaultValueIsIgnored=False,bAdvancedView=False,bOrphanedPin=False,)
End Object
Begin Object Class=/Script/BlueprintGraph.K2Node_CallFunction Name="K2Node_CallFunction_0" ExportPath="/Script/BlueprintGraph.K2Node_CallFunction'/Game/Maps/SampleMaps/HologramUI.HologramUI:PersistentLevel.HologramUI.InitVariables.K2Node_CallFunction_0'"
   bIsPureFunc=True
   FunctionReference=(MemberParent="/Script/CoreUObject.Class'/Script/Engine.GameplayStatics'",MemberName="GetPlayerController")
   NodePosX=1568
   NodePosY=176
   NodeGuid=14D6CA024DBFA6203E4C4EAD1AF7098A
   CustomProperties Pin (PinId=065F9A8642E2B58EA4A897860A32E153,PinName="self",PinFriendlyName=NSLOCTEXT("K2Node", "Target", "Target"),PinType.PinCategory="object",PinType.PinSubCategory="",PinType.PinSubCategoryObject="/Script/CoreUObject.Class'/Script/Engine.GameplayStatics'",PinType.PinSubCategoryMemberReference=(),PinType.PinValueType=(),PinType.ContainerType=None,PinType.bIsReference=False,PinType.bIsConst=False,PinType.bIsWeakPointer=False,PinType.bIsUObjectWrapper=False,PinType.bSerializeAsSinglePrecisionFloat=False,DefaultObject="/Script/Engine.Default__GameplayStatics",PersistentGuid=00000000000000000000000000000000,bHidden=True,bNotConnectable=False,bDefaultValueIsReadOnly=False,bDefaultValueIsIgnored=False,bAdvancedView=False,bOrphanedPin=False,)
   CustomProperties Pin (PinId=DF39DF2C4C27EF2334F4BDA2F5052950,PinName="WorldContextObject",PinType.PinCategory="object",PinType.PinSubCategory="",PinType.PinSubCategoryObject="/Script/CoreUObject.Class'/Script/CoreUObject.Object'",PinType.PinSubCategoryMemberReference=(),PinType.PinValueType=(),PinType.ContainerType=None,PinType.bIsReference=False,PinType.bIsConst=True,PinType.bIsWeakPointer=False,PinType.bIsUObjectWrapper=False,PinType.bSerializeAsSinglePrecisionFloat=False,PersistentGuid=00000000000000000000000000000000,bHidden=True,bNotConnectable=False,bDefaultValueIsReadOnly=False,bDefaultValueIsIgnored=False,bAdvancedView=False,bOrphanedPin=False,)
   CustomProperties Pin (PinId=A410852C4810E34A463F3CBA3D56860B,PinName="PlayerIndex",PinType.PinCategory="int",PinType.PinSubCategory="",PinType.PinSubCategoryObject=None,PinType.PinSubCategoryMemberReference=(),PinType.PinValueType=(),PinType.ContainerType=None,PinType.bIsReference=False,PinType.bIsConst=False,PinType.bIsWeakPointer=False,PinType.bIsUObjectWrapper=False,PinType.bSerializeAsSinglePrecisionFloat=False,DefaultValue="0",AutogeneratedDefaultValue="0",PersistentGuid=00000000000000000000000000000000,bHidden=False,bNotConnectable=False,bDefaultValueIsReadOnly=False,bDefaultValueIsIgnored=False,bAdvancedView=False,bOrphanedPin=False,)
   CustomProperties Pin (PinId=C4DDBB884726A5D4827DA8A0401B0E88,PinName="ReturnValue",Direction="EGPD_Output",PinType.PinCategory="object",PinType.PinSubCategory="",PinType.PinSubCategoryObject="/Script/CoreUObject.Class'/Script/Engine.PlayerController'",PinType.PinSubCategoryMemberReference=(),PinType.PinValueType=(),PinType.ContainerType=None,PinType.bIsReference=False,PinType.bIsConst=False,PinType.bIsWeakPointer=False,PinType.bIsUObjectWrapper=False,PinType.bSerializeAsSinglePrecisionFloat=False,LinkedTo=(K2Node_CallFunction_1 C56CEC4D4982E51C7F214EBBDA53170F,),PersistentGuid=00000000000000000000000000000000,bHidden=False,bNotConnectable=False,bDefaultValueIsReadOnly=False,bDefaultValueIsIgnored=False,bAdvancedView=False,bOrphanedPin=False,)
End Object
Begin Object Class=/Script/BlueprintGraph.K2Node_CallFunction Name="K2Node_CallFunction_1" ExportPath="/Script/BlueprintGraph.K2Node_CallFunction'/Game/Maps/SampleMaps/HologramUI.HologramUI:PersistentLevel.HologramUI.InitVariables.K2Node_CallFunction_1'"
   bIsPureFunc=True
   bIsConstFunc=True
   FunctionReference=(MemberParent="/Script/CoreUObject.Class'/Script/Engine.PlayerController'",MemberName="GetHUD")
   NodePosX=1856
   NodePosY=160
   ErrorType=3
   NodeGuid=15A51BDF4F9DC0556111E1BD4B8B8F89
   CustomProperties Pin (PinId=C56CEC4D4982E51C7F214EBBDA53170F,PinName="self",PinFriendlyName=NSLOCTEXT("K2Node", "Target", "Target"),PinType.PinCategory="object",PinType.PinSubCategory="",PinType.PinSubCategoryObject="/Script/CoreUObject.Class'/Script/Engine.PlayerController'",PinType.PinSubCategoryMemberReference=(),PinType.PinValueType=(),PinType.ContainerType=None,PinType.bIsReference=False,PinType.bIsConst=False,PinType.bIsWeakPointer=False,PinType.bIsUObjectWrapper=False,PinType.bSerializeAsSinglePrecisionFloat=False,LinkedTo=(K2Node_CallFunction_0 C4DDBB884726A5D4827DA8A0401B0E88,),PersistentGuid=00000000000000000000000000000000,bHidden=False,bNotConnectable=False,bDefaultValueIsReadOnly=False,bDefaultValueIsIgnored=False,bAdvancedView=False,bOrphanedPin=False,)
   CustomProperties Pin (PinId=6C2074AF4C46CBB9080869A49CD42C1B,PinName="ReturnValue",Direction="EGPD_Output",PinType.PinCategory="object",PinType.PinSubCategory="",PinType.PinSubCategoryObject="/Script/CoreUObject.Class'/Script/Engine.HUD'",PinType.PinSubCategoryMemberReference=(),PinType.PinValueType=(),PinType.ContainerType=None,PinType.bIsReference=False,PinType.bIsConst=False,PinType.bIsWeakPointer=False,PinType.bIsUObjectWrapper=False,PinType.bSerializeAsSinglePrecisionFloat=False,LinkedTo=(K2Node_DynamicCast_6 D93DB71144987047D1AA8DBBDD832829,),PersistentGuid=00000000000000000000000000000000,bHidden=False,bNotConnectable=False,bDefaultValueIsReadOnly=False,bDefaultValueIsIgnored=False,bAdvancedView=False,bOrphanedPin=False,)
End Object
Begin Object Class=/Script/BlueprintGraph.K2Node_DynamicCast Name="K2Node_DynamicCast_6" ExportPath="/Script/BlueprintGraph.K2Node_DynamicCast'/Game/Maps/SampleMaps/HologramUI.HologramUI:PersistentLevel.HologramUI.InitVariables.K2Node_DynamicCast_6'"
   TargetType="/Script/CoreUObject.Class'/Script/CohtmlPlugin.CohtmlGameHUD'"
   NodePosX=2112
   NodePosY=16
   NodeGuid=231121034E179A8E094B6DB07B09CC4B
   CustomProperties Pin (PinId=698FAA1C4365DE4ADC712284F46D14BC,PinName="execute",PinType.PinCategory="exec",PinType.PinSubCategory="",PinType.PinSubCategoryObject=None,PinType.PinSubCategoryMemberReference=(),PinType.PinValueType=(),PinType.ContainerType=None,PinType.bIsReference=False,PinType.bIsConst=False,PinType.bIsWeakPointer=False,PinType.bIsUObjectWrapper=False,PinType.bSerializeAsSinglePrecisionFloat=False,LinkedTo=(K2Node_VariableSet_6 6D68EF534DDF9E115D74F0BBF74A5FE5,),PersistentGuid=00000000000000000000000000000000,bHidden=False,bNotConnectable=False,bDefaultValueIsReadOnly=False,bDefaultValueIsIgnored=False,bAdvancedView=False,bOrphanedPin=False,)
   CustomProperties Pin (PinId=2FF3E83649FDFF04C9A47A844AFFA94C,PinName="then",Direction="EGPD_Output",PinType.PinCategory="exec",PinType.PinSubCategory="",PinType.PinSubCategoryObject=None,PinType.PinSubCategoryMemberReference=(),PinType.PinValueType=(),PinType.ContainerType=None,PinType.bIsReference=False,PinType.bIsConst=False,PinType.bIsWeakPointer=False,PinType.bIsUObjectWrapper=False,PinType.bSerializeAsSinglePrecisionFloat=False,LinkedTo=(K2Node_VariableSet_12 5E4124324B0CB553F76983AD29DDB8AE,),PersistentGuid=00000000000000000000000000000000,bHidden=False,bNotConnectable=False,bDefaultValueIsReadOnly=False,bDefaultValueIsIgnored=False,bAdvancedView=False,bOrphanedPin=False,)
   CustomProperties Pin (PinId=8EE978994C66914D8FC89AA758B2598E,PinName="CastFailed",Direction="EGPD_Output",PinType.PinCategory="exec",PinType.PinSubCategory="",PinType.PinSubCategoryObject=None,PinType.PinSubCategoryMemberReference=(),PinType.PinValueType=(),PinType.ContainerType=None,PinType.bIsReference=False,PinType.bIsConst=False,PinType.bIsWeakPointer=False,PinType.bIsUObjectWrapper=False,PinType.bSerializeAsSinglePrecisionFloat=False,PersistentGuid=00000000000000000000000000000000,bHidden=False,bNotConnectable=False,bDefaultValueIsReadOnly=False,bDefaultValueIsIgnored=False,bAdvancedView=False,bOrphanedPin=False,)
   CustomProperties Pin (PinId=D93DB71144987047D1AA8DBBDD832829,PinName="Object",PinType.PinCategory="object",PinType.PinSubCategory="",PinType.PinSubCategoryObject="/Script/CoreUObject.Class'/Script/CoreUObject.Object'",PinType.PinSubCategoryMemberReference=(),PinType.PinValueType=(),PinType.ContainerType=None,PinType.bIsReference=False,PinType.bIsConst=False,PinType.bIsWeakPointer=False,PinType.bIsUObjectWrapper=False,PinType.bSerializeAsSinglePrecisionFloat=False,LinkedTo=(K2Node_CallFunction_1 6C2074AF4C46CBB9080869A49CD42C1B,),PersistentGuid=00000000000000000000000000000000,bHidden=False,bNotConnectable=False,bDefaultValueIsReadOnly=False,bDefaultValueIsIgnored=False,bAdvancedView=False,bOrphanedPin=False,)
   CustomProperties Pin (PinId=6E4BFE214D6DD76F93703F8582D334B2,PinName="AsGameface GameHUD",Direction="EGPD_Output",PinType.PinCategory="object",PinType.PinSubCategory="",PinType.PinSubCategoryObject="/Script/CoreUObject.Class'/Script/CohtmlPlugin.CohtmlGameHUD'",PinType.PinSubCategoryMemberReference=(),PinType.PinValueType=(),PinType.ContainerType=None,PinType.bIsReference=False,PinType.bIsConst=False,PinType.bIsWeakPointer=False,PinType.bIsUObjectWrapper=False,PinType.bSerializeAsSinglePrecisionFloat=False,LinkedTo=(K2Node_VariableGet_14 6EE057F34ED142109F801B974118A43E,),PersistentGuid=00000000000000000000000000000000,bHidden=False,bNotConnectable=False,bDefaultValueIsReadOnly=False,bDefaultValueIsIgnored=False,bAdvancedView=False,bOrphanedPin=False,)
   CustomProperties Pin (PinId=0241E42D453860F45E4A3DB51B3D7BCB,PinName="bSuccess",Direction="EGPD_Output",PinType.PinCategory="bool",PinType.PinSubCategory="",PinType.PinSubCategoryObject=None,PinType.PinSubCategoryMemberReference=(),PinType.PinValueType=(),PinType.ContainerType=None,PinType.bIsReference=False,PinType.bIsConst=False,PinType.bIsWeakPointer=False,PinType.bIsUObjectWrapper=False,PinType.bSerializeAsSinglePrecisionFloat=False,PersistentGuid=00000000000000000000000000000000,bHidden=True,bNotConnectable=False,bDefaultValueIsReadOnly=False,bDefaultValueIsIgnored=False,bAdvancedView=False,bOrphanedPin=False,)
End Object
Begin Object Class=/Script/BlueprintGraph.K2Node_VariableGet Name="K2Node_VariableGet_14" ExportPath="/Script/BlueprintGraph.K2Node_VariableGet'/Game/Maps/SampleMaps/HologramUI.HologramUI:PersistentLevel.HologramUI.InitVariables.K2Node_VariableGet_14'"
   VariableReference=(MemberParent="/Script/CoreUObject.Class'/Script/CohtmlPlugin.CohtmlGameHUD'",MemberName="CohtmlHUD")
   SelfContextInfo=NotSelfContext
   NodePosX=2400
   NodePosY=96
   ErrorType=1
   NodeGuid=BE7456F34FEDF2C88B8F66888D20BFBF
   CustomProperties Pin (PinId=007EDB2240F8C6D60DECFCA5282B724D,PinName="CohtmlHUD",PinFriendlyName=NSLOCTEXT("", "FBB17A28454A0D60D9BC2189AD53717C", "Gameface HUD"),Direction="EGPD_Output",PinType.PinCategory="object",PinType.PinSubCategory="",PinType.PinSubCategoryObject="/Script/CoreUObject.Class'/Script/CohtmlPlugin.CohtmlHUD'",PinType.PinSubCategoryMemberReference=(),PinType.PinValueType=(),PinType.ContainerType=None,PinType.bIsReference=False,PinType.bIsConst=False,PinType.bIsWeakPointer=False,PinType.bIsUObjectWrapper=False,PinType.bSerializeAsSinglePrecisionFloat=False,LinkedTo=(K2Node_VariableSet_12 57ABDA2540D0458625B6ADBC88BBB288,),PersistentGuid=00000000000000000000000000000000,bHidden=False,bNotConnectable=False,bDefaultValueIsReadOnly=False,bDefaultValueIsIgnored=False,bAdvancedView=False,bOrphanedPin=False,)
   CustomProperties Pin (PinId=6EE057F34ED142109F801B974118A43E,PinName="self",PinFriendlyName=NSLOCTEXT("K2Node", "Target", "Target"),PinType.PinCategory="object",PinType.PinSubCategory="",PinType.PinSubCategoryObject="/Script/CoreUObject.Class'/Script/CohtmlPlugin.CohtmlGameHUD'",PinType.PinSubCategoryMemberReference=(),PinType.PinValueType=(),PinType.ContainerType=None,PinType.bIsReference=False,PinType.bIsConst=False,PinType.bIsWeakPointer=False,PinType.bIsUObjectWrapper=False,PinType.bSerializeAsSinglePrecisionFloat=False,LinkedTo=(K2Node_DynamicCast_6 6E4BFE214D6DD76F93703F8582D334B2,),PersistentGuid=00000000000000000000000000000000,bHidden=False,bNotConnectable=False,bDefaultValueIsReadOnly=False,bDefaultValueIsIgnored=False,bAdvancedView=False,bOrphanedPin=False,)
End Object
Begin Object Class=/Script/BlueprintGraph.K2Node_CallFunction Name="K2Node_CallFunction_29" ExportPath="/Script/BlueprintGraph.K2Node_CallFunction'/Game/Maps/SampleMaps/HologramUI.HologramUI:PersistentLevel.HologramUI.InitVariables.K2Node_CallFunction_29'"
   FunctionReference=(MemberParent="/Script/CoreUObject.Class'/Script/Engine.GameplayStatics'",MemberName="GetAllActorsOfClassWithTag")
   NodePosX=2944
   NodePosY=16
   NodeGuid=02AC9743433F585434B6F09173DBC528
   CustomProperties Pin (PinId=9C19AB28471C6268972B4CA72FC2A7BD,PinName="execute",PinToolTip="
Exec",PinType.PinCategory="exec",PinType.PinSubCategory="",PinType.PinSubCategoryObject=None,PinType.PinSubCategoryMemberReference=(),PinType.PinValueType=(),PinType.ContainerType=None,PinType.bIsReference=False,PinType.bIsConst=False,PinType.bIsWeakPointer=False,PinType.bIsUObjectWrapper=False,PinType.bSerializeAsSinglePrecisionFloat=False,LinkedTo=(K2Node_VariableSet_12 0A862B6741BBF845CEC8989519779E4E,),PersistentGuid=00000000000000000000000000000000,bHidden=False,bNotConnectable=False,bDefaultValueIsReadOnly=False,bDefaultValueIsIgnored=False,bAdvancedView=False,bOrphanedPin=False,)
   CustomProperties Pin (PinId=5EE9896F4AA06535747BD6872E239A29,PinName="then",PinToolTip="
Exec",Direction="EGPD_Output",PinType.PinCategory="exec",PinType.PinSubCategory="",PinType.PinSubCategoryObject=None,PinType.PinSubCategoryMemberReference=(),PinType.PinValueType=(),PinType.ContainerType=None,PinType.bIsReference=False,PinType.bIsConst=False,PinType.bIsWeakPointer=False,PinType.bIsUObjectWrapper=False,PinType.bSerializeAsSinglePrecisionFloat=False,LinkedTo=(K2Node_VariableSet_13 4AA5DD35408DD45C0FEB4CABC83BED57,),PersistentGuid=00000000000000000000000000000000,bHidden=False,bNotConnectable=False,bDefaultValueIsReadOnly=False,bDefaultValueIsIgnored=False,bAdvancedView=False,bOrphanedPin=False,)
   CustomProperties Pin (PinId=CA5849E1459A2CACF695C78E87D7D26B,PinName="self",PinFriendlyName=NSLOCTEXT("K2Node", "Target", "Target"),PinToolTip="Target
Gameplay Statics Object Reference",PinType.PinCategory="object",PinType.PinSubCategory="",PinType.PinSubCategoryObject="/Script/CoreUObject.Class'/Script/Engine.GameplayStatics'",PinType.PinSubCategoryMemberReference=(),PinType.PinValueType=(),PinType.ContainerType=None,PinType.bIsReference=False,PinType.bIsConst=False,PinType.bIsWeakPointer=False,PinType.bIsUObjectWrapper=False,PinType.bSerializeAsSinglePrecisionFloat=False,DefaultObject="/Script/Engine.Default__GameplayStatics",PersistentGuid=00000000000000000000000000000000,bHidden=True,bNotConnectable=False,bDefaultValueIsReadOnly=False,bDefaultValueIsIgnored=False,bAdvancedView=False,bOrphanedPin=False,)
   CustomProperties Pin (PinId=B8C2C3BD4FC5F3328C2DE8BC2BB744AB,PinName="WorldContextObject",PinToolTip="World Context Object
Object Reference",PinType.PinCategory="object",PinType.PinSubCategory="",PinType.PinSubCategoryObject="/Script/CoreUObject.Class'/Script/CoreUObject.Object'",PinType.PinSubCategoryMemberReference=(),PinType.PinValueType=(),PinType.ContainerType=None,PinType.bIsReference=False,PinType.bIsConst=True,PinType.bIsWeakPointer=False,PinType.bIsUObjectWrapper=False,PinType.bSerializeAsSinglePrecisionFloat=False,PersistentGuid=00000000000000000000000000000000,bHidden=True,bNotConnectable=False,bDefaultValueIsReadOnly=False,bDefaultValueIsIgnored=False,bAdvancedView=False,bOrphanedPin=False,)
   CustomProperties Pin (PinId=E1AFBC1E4EDBC039CFD21A898330D905,PinName="ActorClass",PinToolTip="Actor Class
Actor Class Reference

Class of Actor to find. Must be specified or result array will be empty.",PinType.PinCategory="class",PinType.PinSubCategory="",PinType.PinSubCategoryObject="/Script/CoreUObject.Class'/Script/Engine.Actor'",PinType.PinSubCategoryMemberReference=(),PinType.PinValueType=(),PinType.ContainerType=None,PinType.bIsReference=False,PinType.bIsConst=False,PinType.bIsWeakPointer=False,PinType.bIsUObjectWrapper=True,PinType.bSerializeAsSinglePrecisionFloat=False,DefaultObject="/Script/Engine.Actor",PersistentGuid=00000000000000000000000000000000,bHidden=False,bNotConnectable=False,bDefaultValueIsReadOnly=False,bDefaultValueIsIgnored=False,bAdvancedView=False,bOrphanedPin=False,)
   CustomProperties Pin (PinId=1CB76E9D45586B50BD71248765D236D4,PinName="Tag",PinToolTip="Tag
Name

Tag to find. Must be specified or result array will be empty.",PinType.PinCategory="name",PinType.PinSubCategory="",PinType.PinSubCategoryObject=None,PinType.PinSubCategoryMemberReference=(),PinType.PinValueType=(),PinType.ContainerType=None,PinType.bIsReference=False,PinType.bIsConst=False,PinType.bIsWeakPointer=False,PinType.bIsUObjectWrapper=False,PinType.bSerializeAsSinglePrecisionFloat=False,DefaultValue="tip",AutogeneratedDefaultValue="None",PersistentGuid=00000000000000000000000000000000,bHidden=False,bNotConnectable=False,bDefaultValueIsReadOnly=False,bDefaultValueIsIgnored=False,bAdvancedView=False,bOrphanedPin=False,)
   CustomProperties Pin (PinId=536602154E5B68E6E1298CAF6EC9327D,PinName="OutActors",PinToolTip="Out Actors
Array of Actor Object References

Output array of Actors of the specified tag.",Direction="EGPD_Output",PinType.PinCategory="object",PinType.PinSubCategory="",PinType.PinSubCategoryObject="/Script/CoreUObject.Class'/Script/Engine.Actor'",PinType.PinSubCategoryMemberReference=(),PinType.PinValueType=(),PinType.ContainerType=Array,PinType.bIsReference=False,PinType.bIsConst=False,PinType.bIsWeakPointer=False,PinType.bIsUObjectWrapper=False,PinType.bSerializeAsSinglePrecisionFloat=False,LinkedTo=(K2Node_GetArrayItem_5 6B94CD7E4BF51BEE037A08AA4A933BB0,),PersistentGuid=00000000000000000000000000000000,bHidden=False,bNotConnectable=False,bDefaultValueIsReadOnly=False,bDefaultValueIsIgnored=False,bAdvancedView=False,bOrphanedPin=False,)
End Object
Begin Object Class=/Script/BlueprintGraph.K2Node_GetArrayItem Name="K2Node_GetArrayItem_5" ExportPath="/Script/BlueprintGraph.K2Node_GetArrayItem'/Game/Maps/SampleMaps/HologramUI.HologramUI:PersistentLevel.HologramUI.InitVariables.K2Node_GetArrayItem_5'"
   bReturnByRefDesired=False
   NodePosX=3232
   NodePosY=96
   NodeGuid=4076DFA7423E94B8D40E649433766E78
   CustomProperties Pin (PinId=6B94CD7E4BF51BEE037A08AA4A933BB0,PinName="Array",PinType.PinCategory="object",PinType.PinSubCategory="",PinType.PinSubCategoryObject="/Script/CoreUObject.Class'/Script/Engine.Actor'",PinType.PinSubCategoryMemberReference=(),PinType.PinValueType=(),PinType.ContainerType=Array,PinType.bIsReference=False,PinType.bIsConst=False,PinType.bIsWeakPointer=False,PinType.bIsUObjectWrapper=False,PinType.bSerializeAsSinglePrecisionFloat=False,LinkedTo=(K2Node_CallFunction_29 536602154E5B68E6E1298CAF6EC9327D,),PersistentGuid=00000000000000000000000000000000,bHidden=False,bNotConnectable=False,bDefaultValueIsReadOnly=False,bDefaultValueIsIgnored=False,bAdvancedView=False,bOrphanedPin=False,)
   CustomProperties Pin (PinId=1408752847168E62B51E769416B331F1,PinName="Dimension 1",PinType.PinCategory="int",PinType.PinSubCategory="",PinType.PinSubCategoryObject=None,PinType.PinSubCategoryMemberReference=(),PinType.PinValueType=(),PinType.ContainerType=None,PinType.bIsReference=False,PinType.bIsConst=False,PinType.bIsWeakPointer=False,PinType.bIsUObjectWrapper=False,PinType.bSerializeAsSinglePrecisionFloat=False,DefaultValue="0",AutogeneratedDefaultValue="0",PersistentGuid=00000000000000000000000000000000,bHidden=False,bNotConnectable=False,bDefaultValueIsReadOnly=False,bDefaultValueIsIgnored=False,bAdvancedView=False,bOrphanedPin=False,)
   CustomProperties Pin (PinId=B1DB08EF4D82BB4E5D741AA66C70AFC4,PinName="Output",Direction="EGPD_Output",PinType.PinCategory="object",PinType.PinSubCategory="",PinType.PinSubCategoryObject="/Script/CoreUObject.Class'/Script/Engine.Actor'",PinType.PinSubCategoryMemberReference=(),PinType.PinValueType=(),PinType.ContainerType=None,PinType.bIsReference=False,PinType.bIsConst=False,PinType.bIsWeakPointer=False,PinType.bIsUObjectWrapper=False,PinType.bSerializeAsSinglePrecisionFloat=False,LinkedTo=(K2Node_VariableSet_13 3A8B4248471FA28BC7F4CE87C65EA0A2,),PersistentGuid=00000000000000000000000000000000,bHidden=False,bNotConnectable=False,bDefaultValueIsReadOnly=False,bDefaultValueIsIgnored=False,bAdvancedView=False,bOrphanedPin=False,)
End Object
Begin Object Class=/Script/BlueprintGraph.K2Node_VariableSet Name="K2Node_VariableSet_6" ExportPath="/Script/BlueprintGraph.K2Node_VariableSet'/Game/Maps/SampleMaps/HologramUI.HologramUI:PersistentLevel.HologramUI.InitVariables.K2Node_VariableSet_6'"
   VariableReference=(MemberName="In World Screen",MemberGuid=D4D4ADFF4DA2B389CCABFABC7B3F8F2F,bSelfContext=True)
   NodePosX=1808
   NodePosY=16
   NodeGuid=7B607D384D1025628FAD668D4BE1C923
   CustomProperties Pin (PinId=FD4ABB034AAFB4F07DCAE598F8D029F5,PinName="execute",PinType.PinCategory="exec",PinType.PinSubCategory="",PinType.PinSubCategoryObject=None,PinType.PinSubCategoryMemberReference=(),PinType.PinValueType=(),PinType.ContainerType=None,PinType.bIsReference=False,PinType.bIsConst=False,PinType.bIsWeakPointer=False,PinType.bIsUObjectWrapper=False,PinType.bSerializeAsSinglePrecisionFloat=False,LinkedTo=(K2Node_CallFunction_2 BFAB332243A3BC5B28E365A155231B17,),PersistentGuid=00000000000000000000000000000000,bHidden=False,bNotConnectable=False,bDefaultValueIsReadOnly=False,bDefaultValueIsIgnored=False,bAdvancedView=False,bOrphanedPin=False,)
   CustomProperties Pin (PinId=6D68EF534DDF9E115D74F0BBF74A5FE5,PinName="then",Direction="EGPD_Output",PinType.PinCategory="exec",PinType.PinSubCategory="",PinType.PinSubCategoryObject=None,PinType.PinSubCategoryMemberReference=(),PinType.PinValueType=(),PinType.ContainerType=None,PinType.bIsReference=False,PinType.bIsConst=False,PinType.bIsWeakPointer=False,PinType.bIsUObjectWrapper=False,PinType.bSerializeAsSinglePrecisionFloat=False,LinkedTo=(K2Node_DynamicCast_6 698FAA1C4365DE4ADC712284F46D14BC,),PersistentGuid=00000000000000000000000000000000,bHidden=False,bNotConnectable=False,bDefaultValueIsReadOnly=False,bDefaultValueIsIgnored=False,bAdvancedView=False,bOrphanedPin=False,)
   CustomProperties Pin (PinId=FAA9A11445756CF3CF0C1891A322C1DC,PinName="In World Screen",PinType.PinCategory="object",PinType.PinSubCategory="",PinType.PinSubCategoryObject="/Script/CoreUObject.Class'/Script/CohtmlPlugin.CohtmlComponent'",PinType.PinSubCategoryMemberReference=(),PinType.PinValueType=(),PinType.ContainerType=None,PinType.bIsReference=False,PinType.bIsConst=False,PinType.bIsWeakPointer=False,PinType.bIsUObjectWrapper=False,PinType.bSerializeAsSinglePrecisionFloat=False,LinkedTo=(K2Node_VariableGet_0 C196FFC544D4BD7E064ADCA724088BD3,),PersistentGuid=00000000000000000000000000000000,bHidden=False,bNotConnectable=False,bDefaultValueIsReadOnly=False,bDefaultValueIsIgnored=False,bAdvancedView=False,bOrphanedPin=False,)
   CustomProperties Pin (PinId=CC7D93EF4005F77F310A57B7347483FE,PinName="Output_Get",PinToolTip="Retrieves the value of the variable, can use instead of a separate Get node",Direction="EGPD_Output",PinType.PinCategory="object",PinType.PinSubCategory="",PinType.PinSubCategoryObject="/Script/CoreUObject.Class'/Script/CohtmlPlugin.CohtmlComponent'",PinType.PinSubCategoryMemberReference=(),PinType.PinValueType=(),PinType.ContainerType=None,PinType.bIsReference=False,PinType.bIsConst=False,PinType.bIsWeakPointer=False,PinType.bIsUObjectWrapper=False,PinType.bSerializeAsSinglePrecisionFloat=False,PersistentGuid=00000000000000000000000000000000,bHidden=False,bNotConnectable=False,bDefaultValueIsReadOnly=False,bDefaultValueIsIgnored=False,bAdvancedView=False,bOrphanedPin=False,)
   CustomProperties Pin (PinId=3940677148D214774DD34098C5064083,PinName="self",PinFriendlyName=NSLOCTEXT("K2Node", "Target", "Target"),PinType.PinCategory="object",PinType.PinSubCategory="",PinType.PinSubCategoryObject="/Script/Engine.BlueprintGeneratedClass'/Game/Maps/SampleMaps/HologramUI.HologramUI_C'",PinType.PinSubCategoryMemberReference=(),PinType.PinValueType=(),PinType.ContainerType=None,PinType.bIsReference=False,PinType.bIsConst=False,PinType.bIsWeakPointer=False,PinType.bIsUObjectWrapper=False,PinType.bSerializeAsSinglePrecisionFloat=False,PersistentGuid=00000000000000000000000000000000,bHidden=True,bNotConnectable=False,bDefaultValueIsReadOnly=False,bDefaultValueIsIgnored=False,bAdvancedView=False,bOrphanedPin=False,)
End Object
Begin Object Class=/Script/BlueprintGraph.K2Node_VariableSet Name="K2Node_VariableSet_12" ExportPath="/Script/BlueprintGraph.K2Node_VariableSet'/Game/Maps/SampleMaps/HologramUI.HologramUI:PersistentLevel.HologramUI.InitVariables.K2Node_VariableSet_12'"
   VariableReference=(MemberName="Gameface HUD",MemberGuid=2F5B2D4447E56AFFC785709C760A1A4A,bSelfContext=True)
   NodePosX=2672
   NodePosY=32
   NodeGuid=88928D014A9423A612A837AE7A299284
   CustomProperties Pin (PinId=5E4124324B0CB553F76983AD29DDB8AE,PinName="execute",PinType.PinCategory="exec",PinType.PinSubCategory="",PinType.PinSubCategoryObject=None,PinType.PinSubCategoryMemberReference=(),PinType.PinValueType=(),PinType.ContainerType=None,PinType.bIsReference=False,PinType.bIsConst=False,PinType.bIsWeakPointer=False,PinType.bIsUObjectWrapper=False,PinType.bSerializeAsSinglePrecisionFloat=False,LinkedTo=(K2Node_DynamicCast_6 2FF3E83649FDFF04C9A47A844AFFA94C,),PersistentGuid=00000000000000000000000000000000,bHidden=False,bNotConnectable=False,bDefaultValueIsReadOnly=False,bDefaultValueIsIgnored=False,bAdvancedView=False,bOrphanedPin=False,)
   CustomProperties Pin (PinId=0A862B6741BBF845CEC8989519779E4E,PinName="then",Direction="EGPD_Output",PinType.PinCategory="exec",PinType.PinSubCategory="",PinType.PinSubCategoryObject=None,PinType.PinSubCategoryMemberReference=(),PinType.PinValueType=(),PinType.ContainerType=None,PinType.bIsReference=False,PinType.bIsConst=False,PinType.bIsWeakPointer=False,PinType.bIsUObjectWrapper=False,PinType.bSerializeAsSinglePrecisionFloat=False,LinkedTo=(K2Node_CallFunction_29 9C19AB28471C6268972B4CA72FC2A7BD,),PersistentGuid=00000000000000000000000000000000,bHidden=False,bNotConnectable=False,bDefaultValueIsReadOnly=False,bDefaultValueIsIgnored=False,bAdvancedView=False,bOrphanedPin=False,)
   CustomProperties Pin (PinId=57ABDA2540D0458625B6ADBC88BBB288,PinName="Gameface HUD",PinType.PinCategory="object",PinType.PinSubCategory="",PinType.PinSubCategoryObject="/Script/CoreUObject.Class'/Script/CohtmlPlugin.CohtmlHUD'",PinType.PinSubCategoryMemberReference=(),PinType.PinValueType=(),PinType.ContainerType=None,PinType.bIsReference=False,PinType.bIsConst=False,PinType.bIsWeakPointer=False,PinType.bIsUObjectWrapper=False,PinType.bSerializeAsSinglePrecisionFloat=False,LinkedTo=(K2Node_VariableGet_14 007EDB2240F8C6D60DECFCA5282B724D,),PersistentGuid=00000000000000000000000000000000,bHidden=False,bNotConnectable=False,bDefaultValueIsReadOnly=False,bDefaultValueIsIgnored=False,bAdvancedView=False,bOrphanedPin=False,)
   CustomProperties Pin (PinId=1AC92B244777CEE503808C9C55BB8FF0,PinName="Output_Get",PinToolTip="Retrieves the value of the variable, can use instead of a separate Get node",Direction="EGPD_Output",PinType.PinCategory="object",PinType.PinSubCategory="",PinType.PinSubCategoryObject="/Script/CoreUObject.Class'/Script/CohtmlPlugin.CohtmlHUD'",PinType.PinSubCategoryMemberReference=(),PinType.PinValueType=(),PinType.ContainerType=None,PinType.bIsReference=False,PinType.bIsConst=False,PinType.bIsWeakPointer=False,PinType.bIsUObjectWrapper=False,PinType.bSerializeAsSinglePrecisionFloat=False,PersistentGuid=00000000000000000000000000000000,bHidden=False,bNotConnectable=False,bDefaultValueIsReadOnly=False,bDefaultValueIsIgnored=False,bAdvancedView=False,bOrphanedPin=False,)
   CustomProperties Pin (PinId=140B8E3D4A54509DC3F0EEB7BB51C0B4,PinName="self",PinFriendlyName=NSLOCTEXT("K2Node", "Target", "Target"),PinType.PinCategory="object",PinType.PinSubCategory="",PinType.PinSubCategoryObject="/Script/Engine.BlueprintGeneratedClass'/Game/Maps/SampleMaps/HologramUI.HologramUI_C'",PinType.PinSubCategoryMemberReference=(),PinType.PinValueType=(),PinType.ContainerType=None,PinType.bIsReference=False,PinType.bIsConst=False,PinType.bIsWeakPointer=False,PinType.bIsUObjectWrapper=False,PinType.bSerializeAsSinglePrecisionFloat=False,PersistentGuid=00000000000000000000000000000000,bHidden=True,bNotConnectable=False,bDefaultValueIsReadOnly=False,bDefaultValueIsIgnored=False,bAdvancedView=False,bOrphanedPin=False,)
End Object
Begin Object Class=/Script/BlueprintGraph.K2Node_VariableSet Name="K2Node_VariableSet_13" ExportPath="/Script/BlueprintGraph.K2Node_VariableSet'/Game/Maps/SampleMaps/HologramUI.HologramUI:PersistentLevel.HologramUI.InitVariables.K2Node_VariableSet_13'"
   VariableReference=(MemberName="Tip",MemberGuid=C19EB9064C161E13CA84038494B9063B,bSelfContext=True)
   NodePosX=3456
   NodePosY=32
   NodeGuid=1F7885384BB7342F1B8D49AF20C7D95D
   CustomProperties Pin (PinId=4AA5DD35408DD45C0FEB4CABC83BED57,PinName="execute",PinType.PinCategory="exec",PinType.PinSubCategory="",PinType.PinSubCategoryObject=None,PinType.PinSubCategoryMemberReference=(),PinType.PinValueType=(),PinType.ContainerType=None,PinType.bIsReference=False,PinType.bIsConst=False,PinType.bIsWeakPointer=False,PinType.bIsUObjectWrapper=False,PinType.bSerializeAsSinglePrecisionFloat=False,LinkedTo=(K2Node_CallFunction_29 5EE9896F4AA06535747BD6872E239A29,),PersistentGuid=00000000000000000000000000000000,bHidden=False,bNotConnectable=False,bDefaultValueIsReadOnly=False,bDefaultValueIsIgnored=False,bAdvancedView=False,bOrphanedPin=False,)
   CustomProperties Pin (PinId=27647C7D4EDD586341EA2DADDB894B42,PinName="then",Direction="EGPD_Output",PinType.PinCategory="exec",PinType.PinSubCategory="",PinType.PinSubCategoryObject=None,PinType.PinSubCategoryMemberReference=(),PinType.PinValueType=(),PinType.ContainerType=None,PinType.bIsReference=False,PinType.bIsConst=False,PinType.bIsWeakPointer=False,PinType.bIsUObjectWrapper=False,PinType.bSerializeAsSinglePrecisionFloat=False,PersistentGuid=00000000000000000000000000000000,bHidden=False,bNotConnectable=False,bDefaultValueIsReadOnly=False,bDefaultValueIsIgnored=False,bAdvancedView=False,bOrphanedPin=False,)
   CustomProperties Pin (PinId=3A8B4248471FA28BC7F4CE87C65EA0A2,PinName="Tip",PinType.PinCategory="object",PinType.PinSubCategory="",PinType.PinSubCategoryObject="/Script/CoreUObject.Class'/Script/Engine.Actor'",PinType.PinSubCategoryMemberReference=(),PinType.PinValueType=(),PinType.ContainerType=None,PinType.bIsReference=False,PinType.bIsConst=False,PinType.bIsWeakPointer=False,PinType.bIsUObjectWrapper=False,PinType.bSerializeAsSinglePrecisionFloat=False,LinkedTo=(K2Node_GetArrayItem_5 B1DB08EF4D82BB4E5D741AA66C70AFC4,),PersistentGuid=00000000000000000000000000000000,bHidden=False,bNotConnectable=False,bDefaultValueIsReadOnly=False,bDefaultValueIsIgnored=False,bAdvancedView=False,bOrphanedPin=False,)
   CustomProperties Pin (PinId=9147A6AC4C94AABBCE23EBAEF88CCF4F,PinName="Output_Get",PinToolTip="Retrieves the value of the variable, can use instead of a separate Get node",Direction="EGPD_Output",PinType.PinCategory="object",PinType.PinSubCategory="",PinType.PinSubCategoryObject="/Script/CoreUObject.Class'/Script/Engine.Actor'",PinType.PinSubCategoryMemberReference=(),PinType.PinValueType=(),PinType.ContainerType=None,PinType.bIsReference=False,PinType.bIsConst=False,PinType.bIsWeakPointer=False,PinType.bIsUObjectWrapper=False,PinType.bSerializeAsSinglePrecisionFloat=False,PersistentGuid=00000000000000000000000000000000,bHidden=False,bNotConnectable=False,bDefaultValueIsReadOnly=False,bDefaultValueIsIgnored=False,bAdvancedView=False,bOrphanedPin=False,)
   CustomProperties Pin (PinId=5CA724984B97F181979DAA8686832BC3,PinName="self",PinFriendlyName=NSLOCTEXT("K2Node", "Target", "Target"),PinType.PinCategory="object",PinType.PinSubCategory="",PinType.PinSubCategoryObject="/Script/Engine.BlueprintGeneratedClass'/Game/Maps/SampleMaps/HologramUI.HologramUI_C'",PinType.PinSubCategoryMemberReference=(),PinType.PinValueType=(),PinType.ContainerType=None,PinType.bIsReference=False,PinType.bIsConst=False,PinType.bIsWeakPointer=False,PinType.bIsUObjectWrapper=False,PinType.bSerializeAsSinglePrecisionFloat=False,PersistentGuid=00000000000000000000000000000000,bHidden=True,bNotConnectable=False,bDefaultValueIsReadOnly=False,bDefaultValueIsIgnored=False,bAdvancedView=False,bOrphanedPin=False,)
End Object
Begin Object Class=/Script/BlueprintGraph.K2Node_CallFunction Name="K2Node_CallFunction_2" ExportPath="/Script/BlueprintGraph.K2Node_CallFunction'/Game/Maps/SampleMaps/HologramUI.HologramUI:PersistentLevel.HologramUI.InitVariables.K2Node_CallFunction_2'"
   FunctionReference=(MemberParent="/Script/CoreUObject.Class'/Script/Engine.GameplayStatics'",MemberName="GetAllActorsOfClass")
   NodePosX=1024
   NodeGuid=849B13A146E5E47A3F788D96F4AC3EBB
   CustomProperties Pin (PinId=7603443946BC97914116B090DA7911A6,PinName="execute",PinToolTip="
Exec",PinType.PinCategory="exec",PinType.PinSubCategory="",PinType.PinSubCategoryObject=None,PinType.PinSubCategoryMemberReference=(),PinType.PinValueType=(),PinType.ContainerType=None,PinType.bIsReference=False,PinType.bIsConst=False,PinType.bIsWeakPointer=False,PinType.bIsUObjectWrapper=False,PinType.bSerializeAsSinglePrecisionFloat=False,LinkedTo=(K2Node_FunctionEntry_1 897139344AE0619E4E9EAE9062F7D050,),PersistentGuid=00000000000000000000000000000000,bHidden=False,bNotConnectable=False,bDefaultValueIsReadOnly=False,bDefaultValueIsIgnored=False,bAdvancedView=False,bOrphanedPin=False,)
   CustomProperties Pin (PinId=BFAB332243A3BC5B28E365A155231B17,PinName="then",PinToolTip="
Exec",Direction="EGPD_Output",PinType.PinCategory="exec",PinType.PinSubCategory="",PinType.PinSubCategoryObject=None,PinType.PinSubCategoryMemberReference=(),PinType.PinValueType=(),PinType.ContainerType=None,PinType.bIsReference=False,PinType.bIsConst=False,PinType.bIsWeakPointer=False,PinType.bIsUObjectWrapper=False,PinType.bSerializeAsSinglePrecisionFloat=False,LinkedTo=(K2Node_VariableSet_6 FD4ABB034AAFB4F07DCAE598F8D029F5,),PersistentGuid=00000000000000000000000000000000,bHidden=False,bNotConnectable=False,bDefaultValueIsReadOnly=False,bDefaultValueIsIgnored=False,bAdvancedView=False,bOrphanedPin=False,)
   CustomProperties Pin (PinId=D469660747DCB52C51B5648794CCCDAF,PinName="self",PinFriendlyName=NSLOCTEXT("K2Node", "Target", "Target"),PinToolTip="Target
Gameplay Statics Object Reference",PinType.PinCategory="object",PinType.PinSubCategory="",PinType.PinSubCategoryObject="/Script/CoreUObject.Class'/Script/Engine.GameplayStatics'",PinType.PinSubCategoryMemberReference=(),PinType.PinValueType=(),PinType.ContainerType=None,PinType.bIsReference=False,PinType.bIsConst=False,PinType.bIsWeakPointer=False,PinType.bIsUObjectWrapper=False,PinType.bSerializeAsSinglePrecisionFloat=False,DefaultObject="/Script/Engine.Default__GameplayStatics",PersistentGuid=00000000000000000000000000000000,bHidden=True,bNotConnectable=False,bDefaultValueIsReadOnly=False,bDefaultValueIsIgnored=False,bAdvancedView=False,bOrphanedPin=False,)
   CustomProperties Pin (PinId=5AEA286F4705B9AA92BC0DA88F5EFDA2,PinName="WorldContextObject",PinToolTip="World Context Object
Object Reference",PinType.PinCategory="object",PinType.PinSubCategory="",PinType.PinSubCategoryObject="/Script/CoreUObject.Class'/Script/CoreUObject.Object'",PinType.PinSubCategoryMemberReference=(),PinType.PinValueType=(),PinType.ContainerType=None,PinType.bIsReference=False,PinType.bIsConst=True,PinType.bIsWeakPointer=False,PinType.bIsUObjectWrapper=False,PinType.bSerializeAsSinglePrecisionFloat=False,PersistentGuid=00000000000000000000000000000000,bHidden=True,bNotConnectable=False,bDefaultValueIsReadOnly=False,bDefaultValueIsIgnored=False,bAdvancedView=False,bOrphanedPin=False,)
   CustomProperties Pin (PinId=9B4A0E3E441C4E890054AFB74DC5E217,PinName="ActorClass",PinToolTip="Actor Class
Actor Class Reference

Class of Actor to find. Must be specified or result array will be empty.",PinType.PinCategory="class",PinType.PinSubCategory="",PinType.PinSubCategoryObject="/Script/CoreUObject.Class'/Script/Engine.Actor'",PinType.PinSubCategoryMemberReference=(),PinType.PinValueType=(),PinType.ContainerType=None,PinType.bIsReference=False,PinType.bIsConst=False,PinType.bIsWeakPointer=False,PinType.bIsUObjectWrapper=True,PinType.bSerializeAsSinglePrecisionFloat=False,DefaultObject="/CohtmlPlugin/InWorldPlane.InWorldPlane_C",PersistentGuid=00000000000000000000000000000000,bHidden=False,bNotConnectable=False,bDefaultValueIsReadOnly=False,bDefaultValueIsIgnored=False,bAdvancedView=False,bOrphanedPin=False,)
   CustomProperties Pin (PinId=ABF3C10E4A42726E88FD8EB40E785F26,PinName="OutActors",PinToolTip="Out Actors
Array of In World Plane Object References

Output array of Actors of the specified class.",Direction="EGPD_Output",PinType.PinCategory="object",PinType.PinSubCategory="",PinType.PinSubCategoryObject="/Script/Engine.BlueprintGeneratedClass'/CohtmlPlugin/InWorldPlane.InWorldPlane_C'",PinType.PinSubCategoryMemberReference=(),PinType.PinValueType=(),PinType.ContainerType=Array,PinType.bIsReference=False,PinType.bIsConst=False,PinType.bIsWeakPointer=False,PinType.bIsUObjectWrapper=False,PinType.bSerializeAsSinglePrecisionFloat=False,LinkedTo=(K2Node_GetArrayItem_0 C7363D6B4CEE46798C1E38934F79583F,),PersistentGuid=00000000000000000000000000000000,bHidden=False,bNotConnectable=False,bDefaultValueIsReadOnly=False,bDefaultValueIsIgnored=False,bAdvancedView=False,bOrphanedPin=False,)
End Object
Begin Object Class=/Script/BlueprintGraph.K2Node_GetArrayItem Name="K2Node_GetArrayItem_0" ExportPath="/Script/BlueprintGraph.K2Node_GetArrayItem'/Game/Maps/SampleMaps/HologramUI.HologramUI:PersistentLevel.HologramUI.InitVariables.K2Node_GetArrayItem_0'"
   bReturnByRefDesired=False
   NodePosX=1360
   NodePosY=80
   NodeGuid=C2010A0245AB731371F55F982F71C962
   CustomProperties Pin (PinId=C7363D6B4CEE46798C1E38934F79583F,PinName="Array",PinType.PinCategory="object",PinType.PinSubCategory="",PinType.PinSubCategoryObject="/Script/Engine.BlueprintGeneratedClass'/CohtmlPlugin/InWorldPlane.InWorldPlane_C'",PinType.PinSubCategoryMemberReference=(),PinType.PinValueType=(),PinType.ContainerType=Array,PinType.bIsReference=False,PinType.bIsConst=False,PinType.bIsWeakPointer=False,PinType.bIsUObjectWrapper=False,PinType.bSerializeAsSinglePrecisionFloat=False,LinkedTo=(K2Node_CallFunction_2 ABF3C10E4A42726E88FD8EB40E785F26,),PersistentGuid=00000000000000000000000000000000,bHidden=False,bNotConnectable=False,bDefaultValueIsReadOnly=False,bDefaultValueIsIgnored=False,bAdvancedView=False,bOrphanedPin=False,)
   CustomProperties Pin (PinId=C382A47847801D52496A2BBA7CCABF3B,PinName="Dimension 1",PinType.PinCategory="int",PinType.PinSubCategory="",PinType.PinSubCategoryObject=None,PinType.PinSubCategoryMemberReference=(),PinType.PinValueType=(),PinType.ContainerType=None,PinType.bIsReference=False,PinType.bIsConst=False,PinType.bIsWeakPointer=False,PinType.bIsUObjectWrapper=False,PinType.bSerializeAsSinglePrecisionFloat=False,DefaultValue="0",AutogeneratedDefaultValue="0",PersistentGuid=00000000000000000000000000000000,bHidden=False,bNotConnectable=False,bDefaultValueIsReadOnly=False,bDefaultValueIsIgnored=False,bAdvancedView=False,bOrphanedPin=False,)
   CustomProperties Pin (PinId=4CA5DC874943405701B1D2907582711A,PinName="Output",Direction="EGPD_Output",PinType.PinCategory="object",PinType.PinSubCategory="",PinType.PinSubCategoryObject="/Script/Engine.BlueprintGeneratedClass'/CohtmlPlugin/InWorldPlane.InWorldPlane_C'",PinType.PinSubCategoryMemberReference=(),PinType.PinValueType=(),PinType.ContainerType=None,PinType.bIsReference=False,PinType.bIsConst=False,PinType.bIsWeakPointer=False,PinType.bIsUObjectWrapper=False,PinType.bSerializeAsSinglePrecisionFloat=False,LinkedTo=(K2Node_VariableGet_0 C10283A1489A869C4272D9A172AAA2CF,),PersistentGuid=00000000000000000000000000000000,bHidden=False,bNotConnectable=False,bDefaultValueIsReadOnly=False,bDefaultValueIsIgnored=False,bAdvancedView=False,bOrphanedPin=False,)
End Object
Begin Object Class=/Script/BlueprintGraph.K2Node_VariableGet Name="K2Node_VariableGet_0" ExportPath="/Script/BlueprintGraph.K2Node_VariableGet'/Game/Maps/SampleMaps/HologramUI.HologramUI:PersistentLevel.HologramUI.InitVariables.K2Node_VariableGet_0'"
   VariableReference=(MemberParent="/Script/Engine.BlueprintGeneratedClass'/CohtmlPlugin/InWorldPlane.InWorldPlane_C'",MemberName="Cohtml")
   SelfContextInfo=NotSelfContext
   NodePosX=1584
   NodePosY=112
   NodeGuid=A60485B742CB8603FF90FCA70DBBB243
   CustomProperties Pin (PinId=C196FFC544D4BD7E064ADCA724088BD3,PinName="Cohtml",Direction="EGPD_Output",PinType.PinCategory="object",PinType.PinSubCategory="",PinType.PinSubCategoryObject="/Script/CoreUObject.Class'/Script/CohtmlPlugin.CohtmlComponent'",PinType.PinSubCategoryMemberReference=(),PinType.PinValueType=(),PinType.ContainerType=None,PinType.bIsReference=False,PinType.bIsConst=False,PinType.bIsWeakPointer=False,PinType.bIsUObjectWrapper=False,PinType.bSerializeAsSinglePrecisionFloat=False,LinkedTo=(K2Node_VariableSet_6 FAA9A11445756CF3CF0C1891A322C1DC,),PersistentGuid=00000000000000000000000000000000,bHidden=False,bNotConnectable=False,bDefaultValueIsReadOnly=False,bDefaultValueIsIgnored=False,bAdvancedView=False,bOrphanedPin=False,)
   CustomProperties Pin (PinId=C10283A1489A869C4272D9A172AAA2CF,PinName="self",PinFriendlyName=NSLOCTEXT("K2Node", "Target", "Target"),PinType.PinCategory="object",PinType.PinSubCategory="",PinType.PinSubCategoryObject="/Script/Engine.BlueprintGeneratedClass'/CohtmlPlugin/InWorldPlane.InWorldPlane_C'",PinType.PinSubCategoryMemberReference=(),PinType.PinValueType=(),PinType.ContainerType=None,PinType.bIsReference=False,PinType.bIsConst=False,PinType.bIsWeakPointer=False,PinType.bIsUObjectWrapper=False,PinType.bSerializeAsSinglePrecisionFloat=False,LinkedTo=(K2Node_GetArrayItem_0 4CA5DC874943405701B1D2907582711A,),PersistentGuid=00000000000000000000000000000000,bHidden=False,bNotConnectable=False,bDefaultValueIsReadOnly=False,bDefaultValueIsIgnored=False,bAdvancedView=False,bOrphanedPin=False,)
End Object
With this setup, you can now reference the in-world view in the Level Blueprint to implement functionality such as closing and opening the screen when the player toggles their inventory. This functionality will be detailed in the next tutorial.
Frontend
For the frontend, we’ll reuse the animated overlay effect from the first part of this tutorial series. This effect creates a noise-like appearance with animated overlay lines.
First let’s start with the HTML structure for the UI:
1<!DOCTYPE html>2<html lang="en">3
4<head>5    <link6        rel="stylesheet"7        href="./in-world-screen-styles.css"8    >9</head>10
11<body>12    <div class='in-world-screen'>13        <div class="overlay">14            <div class="overlay-lines"></div>15            <div class="overlay-radial"></div>16        </div>17        <div class="wrapper">18            <div class="icon"></div>19            <div class="text">20                Inventory21            </div>22        </div>23    </div>24    <script src="../javascript/cohtml.js"></script>25    <script>26        const screen = document.querySelector('.in-world-screen');27
28        engine.whenReady.then(() => {29            engine.on('playerMenuOpened', () => {30                screen.classList.toggle('hide-screen', true);31            });32
33            engine.on('playerMenuClosed', () => {34                screen.classList.toggle('hide-screen', false);35            });36        });37    </script>38</body>39
40</html>
Wrapper Structure
The main wrapper (in-world-screen) contains:
- An overlay element for the noise effect with two layers:
overlay-linesfor animated horizontal lines.overlay-radialfor a radial gradient that subtly fades the corners.
- A wrapper element holding the icon and the text (
Inventory), arranged vertically with a flex column layout.
Interactivity
- The
cohtml.jslibrary is included to enable communication between the engine and the UI. - The UI listens for two events triggered by the engine:
playerMenuOpened: Hides the in-world screen with a transition by adding thehide-screenclass.playerMenuClosed: Displays the in-world screen again by removing thehide-screenclass.
CSS and Animations
The noise effect is achieved using CSS animations:
overlay-linesuses alinear-gradientbackground animated along the x-axis to simulate moving noise lines.overlay-radialuses aradial-gradientwith opacity animations to create a flickering effect.
Icon animation is achieved by rotating the icon along the Y-axis between 0° and 180°, then back to 0°.
For complete details, check the in-world-screen-styles.css file source:
1body {2 width: 100vw;3 height: 100vh;4}5
6.overlay,7.overlay-lines,8.overlay-radial {9 position: absolute;10 width: 100%;11 height: 100%;12 top: 0;13 left: 0;14 right: 0;15 bottom: 0;16 z-index: 999;17}18
19.overlay {123 collapsed lines
20 mask-image: radial-gradient(circle, rgba(0, 0, 0, 1) 0%, rgba(0, 0, 0, 0.5327380952380952) 65%, rgba(255, 255, 255, 0) 100%);21 mask-size: 90% 90%;22 mask-position: center;23}24
25.overlay-lines {26 background-image: linear-gradient(rgba(0, 200, 228, 0.1) 0%, rgba(0, 200, 228, 0.1) 30%, rgba(255, 255, 255, 0) 30%, rgba(255, 255, 255, 0) 100%);27 background-size: 100% 30px;28 animation: overlay-anim 3s forwards linear infinite;29}30
31.overlay-radial {32 background-image: radial-gradient(circle, rgba(0, 200, 228, 0.2) 0%, rgba(255, 255, 255, 0) 90%, rgba(255, 255, 255, 0) 100%);33 background-size: 200%;34 background-position: center;35 background-repeat: no-repeat;36 opacity: 0;37 animation: overlay-radial-anim 3s forwards linear infinite;38 z-index: 998;39}40
41@keyframes overlay-anim {42 from {43 background-position: 0% 0%;44 }45
46 to {47 background-position: 0% -10%;48 }49}50
51@keyframes overlay-radial-anim {52 0% {53 opacity: 0;54 }55
56 1% {57 opacity: 1;58 }59
60 5% {61 opacity: 0;62 }63
64 19% {65 opacity: 0;66 }67
68 20% {69 opacity: 1;70 }71
72 25% {73 opacity: 0;74 }75
76 59% {77 opacity: 0;78 }79
80 60% {81 opacity: 1;82 }83
84 65% {85 opacity: 0;86 }87
88 100% {89 opacity: 0;90 }91}92
93.in-world-screen {94 background-color: rgb(0, 0, 0, 0);95 color: white;96 width: 100vw;97 height: 100vh;98 position: absolute;99 display: flex;100 align-items: center;101 justify-content: center;102 transition: transform 500ms;103 transform-origin: bottom;104}105
106.hide-screen {107 transform: scaleY(0);108}109
110.wrapper {111 display: flex;112 flex-direction: column;113 justify-content: center;114 align-items: center;115}116
117.icon {118 background-image: url(./assets/iconBackpackSpecial.svg);119 background-repeat: no-repeat;120 background-size: contain;121 height: 35rem;122 width: 35rem;123 animation: rotate-icon 2.5s ease-in-out forwards infinite;124}125
126@keyframes rotate-icon {127 0% {128 transform: rotateY(0deg);129 }130
131 25% {132 transform: rotateY(180deg);133 }134
135 50% {136 transform: rotateY(0deg);137 }138}139
140.text {141 font-size: 7rem;142}The icon used for this example is as follows:
What is next?
In the next part of this tutorial, we’ll focus on implementing the backend in Unreal Engine to support the inventory menu.