Multiplayer UI - Marketplace (Part 5)
10/11/2024
Kaloyan Geshev
A marketplace is an excellent feature in games, allowing players to exchange items with each other. It provides a way for players to earn in-game currency by selling items they no longer need and upgrade their equipment by purchasing items from others.
You can find the rest Multiplayer UI series here.
Showcase Overview
In our previous tutorial, we built an inventory page for our multiplayer UI. Now that players have items in their inventory, we can add a marketplace where players can buy and sell items within the game.
To achieve this, we will extend the existing Express server with new API endpoints that handle inventory transactions, allowing players to manage their items within the marketplace.
Source location
You can find the complete sample source within the ${Gameface package}/Samples/uiresources/UITutorials/MultiplayerUI directory.
srcfolder contains the UI source code.apifolder contains the Express server source code.
Ensure to run npm i before testing the sample.
Refer to the README.md file in this directory for information on running the sample locally or previewing it without building or starting any processes.
Getting started - Backend
To enable users to interact with the marketplace, we need to update our server to handle requests for buying and selling items.
User money
First, we need to ensure every user has a starting balance to participate in the marketplace. To do this, we’ll update the user schema in our database to include a field for their in-game currency.
1const mongoose = require('mongoose');2
3const schema = new mongoose.Schema({14 collapsed lines
4 firstName: String,5 lastName: String,6 email: String,7 password: String,8 status: Boolean,9 totpSecret: String,10 twoFactorEnabled: Boolean,11 friends: [{ type: String }],12 items: [{ type: String }],13 stats: {14 games: Number,15 wins: Number,16 scores: Number17 },18 money: Number19});20
21module.exports = mongoose.model('user', schema);Now that we can store money in the database, we’ll initialize each user with starting funds when they register or log in to the game.
1class UserController {2 async login(req, res) {11 collapsed lines
3 const sessionId = req.headers['session-id'];4 if (sessionId && await sessions.findOne({ _id: sessionId })) return res.send(sessionId);5
6 const user = await User.findOne({ email: req.body.email, password: req.body.password });7 if (!user) return res.status(404).send('Wrong email or password!');8
9 if (!user.items.length) {10 await this.generateUserItems(user);11 await user.save();12 }13
14 if (!user.money) {15 user.money = 30000;16 await user.save();17 }19 collapsed lines
18
19 if (!process.env.TWO_FACTOR_AUTHENTICATION_ENABLED) {20 user.status = true;21 await user.save();22 emit('user-online', user.id);23
24 return res.json({ id: user._id.toString(), sessionId: req.sessionID, firstName: user.firstName, lastName: user.lastName });25 }26
27 if (!user.totpSecret) {28 const secret = authenticator.generateSecret();29 const keyUri = authenticator.keyuri(user.email, 'CoherentSample', secret);30 const secretQrCode = await qrcode.toDataURL(keyUri);31 return res.status(403).json({ error: 'missing_totp', secretQrCode, secret, id: user._id.toString() });32 }33
34 return res.status(403).json({ error: 'totp_verification_required', id: user._id.toString() });35 }36
37 async generateUserData(user) {9 collapsed lines
38 const totalGames = parseInt(Math.random() * 500);39
40 // Generate mock stats data for the new user41 user.stats = {42 games: totalGames,43 wins: parseInt(Math.random() * totalGames),44 scores: parseInt(Math.random() * 50000),45 };46
47 user.money = 30000;1 collapsed line
48 await this.generateUserItems(user);49 }50}In this code, the generateUserData method will be executed when a new user registers, initializing their money along with the randomly generated items as explained in the previous tutorial.
Extending the items schema
To enable items to be listed for sale, we need to add a few additional properties to the item schema in our database. This will make it easier to develop the UI for the marketplace later.
Since our sample ensures that each item is unique for each user, multiple users can’t own the same item at once. That said, it’s straightforward to modify the schema of the items by adding additional properties.
We’ll introduce fields to indicate whether an item is up for sale, the seller’s name and ID, and the price the seller wants for the item.
1const schema = new mongoose.Schema({13 collapsed lines
2 name: String,3 image: String,4 type: String,5 stats: {6 damage: Number,7 durability: Number,8 effect: String,9 criticalHit: Number,10 armor: Number,11 criticalChance: Number,12 attackPower: Number,13 },14 rarity: String,15 forSale: Boolean,16 soldByName: String,17 soldById: String,18 price: Number19});Fetching items available for sale
To allow users to sell items in the marketplace, we first need to retrieve the items available in their inventory. These are items that are not currently marked for sale (forSale property is false).
We will create a new backend route that will handle fetching these items:
1router.get('/users/:id/items-for-sale', auth, idValidator, UserController.getUserItemsForSale);The getUserItemsForSale method will return the list of items in the user’s inventory that are not yet listed for sale.
1class UserController {2    async getUserItemsForSale(req, res) {3        const user = await User.findById(req.params.id);4
5        if (!user) {6            return res.status(404).send('User not found');7        }8
9        const userItems = [];10        for (const itemId of user.items) {11            const itemData = await Items.findById(itemId);12            if (!itemData.forSale) userItems.push({ name: itemData.name, image: itemData.image, _id: itemData._id });13        }14
15        res.json(userItems);16    }17}
Fetching items currently for Sale
To display items currently listed in the marketplace, we need to retrieve them from the backend. We’ll create a new endpoint to fetch all the items that have been marked for sale.
1router.get('/items/for-sale', auth, ItemsController.getItemsForSale);The getItemsForSale method will return all items marked as available for sale, which can then be displayed in the UI.
1class ItemsController {2    async getItemsForSale(req, res) {3        const currentUserId = req.headers['user-id'];4        const filterObject = { forSale: true };5        if (req.query.filterUserItems) filterObject.soldById = currentUserId;6        if (req.query.filterWithoutUserItems) filterObject.soldById = { $ne: currentUserId };7
8        const itemsForSale = await Items.find(filterObject, { id: 1, name: 1, soldByName: 1, image: 1, soldById: 1, price: 1 });9        if (!itemsForSale) {10            return res.status(404).send('No items for sale found');11        }12        res.json(itemsForSale);13    }14}
This method also supports filters that will allow us to show all items for sale, just the current user’s items (when filterUserItems is passed), or items not owned by the current user (when filterWithoutUserItems is passed).
Cancellling an item from listing
If a user wants to remove an item from the marketplace, we need to support this operation by resetting the price, soldById, soldByName, and forSale fields for the item.
First, we’ll define an API endpoint to handle this:
1router.post('/items/:id/cancel', auth, idValidator, ItemsController.cancelItem);The cancelItem method will reset the relevant fields and save the item:
1class ItemsController {2    async cancelItem(req, res) {3        const itemId = req.params.id;4        const item = await Items.findById(itemId);5        item.price = 0;6        item.soldById = '';7        item.soldByName = '';8        item.forSale = false;9        await item.save();10
11        res.send();12    }13}
Selling an item
To list an item for sale in the marketplace, we’ll create a new API endpoint that allows users to submit such a request.
1router.post('/items/:id/sell', auth, idValidator, ItemsController.sellItem);The sellItem method will handle the data sent in the request, which includes the seller’s name, ID, and the price the user wants to set for the item. It will also validate the request to ensure all necessary data is provided.
1class ItemsController {2    async sellItem(req, res) {3        if (!req.body.price) return res.status(202).send(`Please fill the item price first!`);4        if (!req.body.soldByName) return res.status(202).send(`Unable to sell item. Server error occured!`);5        if (!req.body.soldById) return res.status(202).send(`Unable to sell item. Server error occured!`);6
7        const { price, soldByName, soldById } = req.body;8        const itemId = req.params.id;9        const item = await Items.findById(itemId);10        item.price = price;11        item.soldById = soldById;12        item.soldByName = soldByName;13        item.forSale = true;14        await item.save();15
16        res.send();17    }18}
Buying an item
After implementing the logic for listing and removing items for sale, it’s time to enable users to purchase items from the marketplace. To achieve this, we’ll create a new API endpoint for handling item purchase requests.
1router.post('/items/:id/buy', auth, idValidator, ItemsController.buyItem);The buyItem method will retrieve information about the buyer and seller, update their items arrays, transfer ownership of the item, and mark that it is no longer for sale.
1const User = require('../db/users');2
3class ItemsController {4    async buyItem(req, res) {5        const currentUserId = req.headers['user-id'];6        const itemId = req.params.id;7        const item = await Items.findById(itemId);8        if (!item.forSale) return res.status(202).send(`Item is no longer active for sale!`);9
10        const prevItemOwner = await User.findOne({ items: itemId });11        const nextItemOwner = await User.findById(currentUserId);12        if (!prevItemOwner || !nextItemOwner) return res.status(202).send(`Unable to buy item. Server error occured!`);13        if (nextItemOwner.money < item.price) return res.status(202).send(`You don't have enough money to buy this item!`);14
15        prevItemOwner.items = prevItemOwner.items.filter((id) => id !== itemId);16        prevItemOwner.money += item.price;17        nextItemOwner.items.push(itemId);18        nextItemOwner.money -= item.price;19        await prevItemOwner.save();20        await nextItemOwner.save();21
22        item.price = 0;23        item.soldById = '';24        item.soldByName = '';25        item.forSale = false;26        await item.save();27
28        res.send();29    }30}
Notifying users for item purchase
To notify users when an item is purchased, we will use websockets. This allows us to send real-time updates to the UI.
First, we’ll define a method to return all active sockets on the backend.
1async function getSockets() {2    return io.sockets.fetchSockets();3}4
5module.exports = {6    io,7    emit,8    socketConnection,9    getSockets10}
Next, we’ll modify our buyItem method to send a notification to both the buyer and the seller when their account balance changes.
We’ll retrieve the active sockets using the getSockets method and emit a user-money-changed event to both the buyer and the seller if they are online. This event will be handled later in the UI.
1const { getSockets } = require('../io');2
3class ItemsController {4 async buyItem(req, res) {17 collapsed lines
5 const currentUserId = req.headers['user-id'];6 const itemId = req.params.id;7 const item = await Items.findById(itemId);8 if (!item.forSale) return res.status(202).send(`Item is no longer active for sale!`);9
10 const prevItemOwner = await User.findOne({ items: itemId });11 const nextItemOwner = await User.findById(currentUserId);12 if (!prevItemOwner || !nextItemOwner) return res.status(202).send(`Unable to buy item. Server error occured!`);13 if (nextItemOwner.money < item.price) return res.status(202).send(`You don't have enough money to buy this item!`);14
15 prevItemOwner.items = prevItemOwner.items.filter((id) => id !== itemId);16 prevItemOwner.money += item.price;17 nextItemOwner.items.push(itemId);18 nextItemOwner.money -= item.price;19 await prevItemOwner.save();20 await nextItemOwner.save();21
22 const itemPrice = item.price;5 collapsed lines
23 item.price = 0;24 item.soldById = '';25 item.soldByName = '';26 item.forSale = false;27 await item.save();28
29 const sockets = await getSockets();30
31 const nextItemOwnerSocket = sockets.find((socket) => socket.userId === nextItemOwner.id);32 if (nextItemOwnerSocket) nextItemOwnerSocket.emit('user-money-changed', nextItemOwner.money);33
34 const prevItemOwnerSocket = sockets.find((socket) => socket.userId === prevItemOwner.id);35 if (prevItemOwnerSocket) {36 prevItemOwnerSocket.emit('user-money-changed', prevItemOwner.money);37 }38
39 res.send();40 }41}Lastly, we can notify the seller with a socket event that their item has been purchased. The event server-notification-message will send a message containing the purchase details.
1const { getSockets } = require('../io');2
3class ItemsController {4 async buyItem(req, res) {29 collapsed lines
5 const currentUserId = req.headers['user-id'];6 const itemId = req.params.id;7 const item = await Items.findById(itemId);8 if (!item.forSale) return res.status(202).send(`Item is no longer active for sale!`);9
10 const prevItemOwner = await User.findOne({ items: itemId });11 const nextItemOwner = await User.findById(currentUserId);12 if (!prevItemOwner || !nextItemOwner) return res.status(202).send(`Unable to buy item. Server error occured!`);13 if (nextItemOwner.money < item.price) return res.status(202).send(`You don't have enough money to buy this item!`);14
15 prevItemOwner.items = prevItemOwner.items.filter((id) => id !== itemId);16 prevItemOwner.money += item.price;17 nextItemOwner.items.push(itemId);18 nextItemOwner.money -= item.price;19 await prevItemOwner.save();20 await nextItemOwner.save();21
22 const itemPrice = item.price;23 item.price = 0;24 item.soldById = '';25 item.soldByName = '';26 item.forSale = false;27 await item.save();28
29 const sockets = await getSockets();30
31 const nextItemOwnerSocket = sockets.find((socket) => socket.userId === nextItemOwner.id);32 if (nextItemOwnerSocket) nextItemOwnerSocket.emit('user-money-changed', nextItemOwner.money);33
34 const prevItemOwnerSocket = sockets.find((socket) => socket.userId === prevItemOwner.id);35 if (prevItemOwnerSocket) {36 prevItemOwnerSocket.emit('user-money-changed', prevItemOwner.money);37 const message = `User "${prevItemOwner.firstName} ${prevItemOwner.lastName}" purchased your item "${item.name}" for ${itemPrice}$.`;38 prevItemOwnerSocket.emit('server-notification-message', message);39 }40
41 res.send();42 }43}Getting started - Frontend
To create the UI for the marketplace, we will add a new Marketplace page where users can buy and sell items. However, before that, we need to display the user’s in-game currency on the UI.
Displaying the user’s money

To show the user’s current balance, we’ll create a context and provider to manage the user’s money state. This allows us to access the user’s balance throughout the UI without using state management libraries like Redux. It’s essential because later, we’ll use this information to check if the user has enough funds to purchase an item and display messages when they don’t.
We’ll set up a UserMoneyProvider that will store the user’s money state and a useUserMoney hook to access the balance from any component within the provider.
1import React, { createContext, useContext, useState } from "react";2const UserMoneyContext = createContext();3
4export const UserMoneyProvider = ({ children }) => {5    const [userMoney, setUserMoney] = useState(0);6
7    return <UserMoneyContext.Provider value={{userMoney, setUserMoney}}>{children}</UserMoneyContext.Provider>;8};9
10export const useUserMoney = () => {11    return useContext(UserMoneyContext);12};
Next, we need to provide the context in the app. We’ll wrap it around the main routes in App.jsx:
1import { UserMoneyProvider } from './hooks/useUserMoney';2
3const App = () => (4 <HashRouter basename='/'>5 <AuthProvider>6 <UserMoneyProvider>18 collapsed lines
7 <Routes>8 <Route path='/' element={<ProtectedRoute><Home /></ProtectedRoute>} >9 <Route element={<LeaderboardPageWrapper />} >10 <Route index element={<Rankings />} />11 </Route>12 <Route path="inventory" element={<Inventory />} />13 <Route path="marketplace" element={<MarketplacePageWrapper />} >14 <Route index element={<MarketplaceItems />} />15 <Route path="sell" element={<MarketplaceItems />} />16 </Route>17 <Route path="friends" element={<FriendsPageWrapper />} >18 <Route index element={<FriendsList />} />19 <Route path="add-friends" element={<AddFriends />} />20 </Route>21 </Route>22 <Route path='/register' element={<Register />} />23 <Route path='/login' element={<Login />} />24 <Route path='/totp' element={<Totp />} />25 </Routes>26 </UserMoneyProvider>27 </AuthProvider>28 </HashRouter>29);Now we can display or modify the user’s money across the UI. Let’s update Home.jsx to show the user’s balance next to their name in the top-right corner.
We’ll handle a few additional tasks:
- Access the state to set and display the user’s money using the
useUserMoneyhook. - Fetch the user’s balance when the component loads via the
getMoneyDatamethod. - Listen for real-time updates to the user’s money using WebSockets (
user-money-changedevent), which will allow the balance to update dynamically when a transaction occurs.
1import { socket } from '../../socket';2import { useUserMoney } from '../../hooks/useUserMoney';3
4const Home = () => {3 collapsed lines
5 const { logout } = useAuth();6 const [fetch] = useFetch();7 const [user] = useLocalStorage('user');8 const { userMoney, setUserMoney } = useUserMoney();7 collapsed lines
9
10 const onLogout = useCallback(async () => {11 const [xhr, error] = await fetch('POST', `${process.env.SERVER_URL}/api/logout`)12 if (error) return;13 logout();14 }, []);15
16 const getMoneyData = useCallback(async () => {17 const [xhr, error] = await fetch('GET', `${process.env.SERVER_URL}/api/users/${user.id}`);18 if (error) return console.error(error);19
20 const { money } = JSON.parse(xhr.responseText);21
22 setUserMoney(money);23 }, []);24
25 const onUserMoneyChanged = useCallback((money) => {26 setUserMoney(money);27 });28
29 const toggleSocketEvents = useCallback((watch) => {30 socket[watch ? 'on' : 'off']('user-money-changed', onUserMoneyChanged);31 }, []);32
33 useEffect(() => {34 getMoneyData();35 toggleSocketEvents(true);36
37 return (() => {38 toggleSocketEvents(false); // It is required to remove the socket events when the component has been unloaded39 });40 }, []);41
42 return (43 <div className="app">44 {user && <div className='app-user-data'> {user.firstName} {user.lastName}</div>}45 {user && <div className='app-user-data'>46 <div className='app-user-data-money'>47 {userMoney}48 <div className='app-user-data-money-icon'></div>49 </div>50 {user.firstName} {user.lastName}51 </div>}18 collapsed lines
52 <AnimatedBackground></AnimatedBackground>53 <div className='app-wrapper-navigation'>54 <NavLink className='nav-btn' to="/">Leaderboard</NavLink >55 <NavLink className='nav-btn' to="/inventory">Inventory</NavLink >56 <NavLink className='nav-btn' to="/marketplace">Marketplace</NavLink >57 <NavLink className='nav-btn' to="/friends">Friends</NavLink >58 </div>59 <div className='app-wrapper'>60 <Outlet />61 </div>62 <div className='app-footer'>63 <button className='app-logout-btn' onClick={onLogout}>Log out</button>64 </div>65 <gameface-toast ref={toastRef} position="bottom-right" class="app-toast" timeout="10000">66 <div slot="message">Message</div>67 <div slot="close-btn">x</div>68 </gameface-toast>69 </div>70 )71}Reusing spatial navigation for the marketplace page
To enable spatial navigation on our marketplace page, we need to make it reusable. We’ll create a custom hook to initialize spatial navigation, which can be used on both the inventory and marketplace pages.
1import { useEffect } from "react";2import { spatialNavigation } from 'coherent-gameface-interaction-manager';3
4const useSpatialNavigation = (itemsData, className) => {5    useEffect(() => {6        spatialNavigation.remove();7
8        if (itemsData.length) {9            spatialNavigation.add([className]);10            spatialNavigation.focusFirst();11        }12    }, [itemsData]);13}14
15export default useSpatialNavigation;
With this hook in place, we can now remove the initialization of spatial navigation from the inventory page.
1import { spatialNavigation } from 'coherent-gameface-interaction-manager';2import useSpatialNavigation from '../../hooks/useSpatialNavigation';3
4const Inventory = () => {5    useEffect(() => {6        spatialNavigation.remove();7
8        if (itemsData.length) {9            spatialNavigation.add(['.item-preview']);10            spatialNavigation.focusFirst();11        }12    }, [itemsData]);13    useSpatialNavigation(itemsData, '.item-preview');14}
Marketplace page
Now, we can start building the marketplace page, which will allow users to buy or sell items. First, we’ll create a wrapper for the marketplace page, including a menu for switching between views - either for buying or selling items. It will follow the same structure as the leaderboard, using NavLink for navigation and Outlet to display the active view. We’ll also display the selected item’s stats on the right, as we did in the inventory tutorial, using the ItemStats component.
1import React, { useState } from 'react';2import './MarketplacePageWrapper.scss';3import { NavLink, Outlet } from 'react-router-dom';4import ItemStats from '../../../components/ItemStats';5
6const MarketplacePageWrapper = () => {7    const [selectedItemId, setSelectedItemId] = useState('');8
9    return (10        <div className="marketplace">11            <div className='app-wrapper-sub-navigation'>12                <NavLink className='sub-nav-btn' to="/marketplace" end>Buy items</NavLink >13                <NavLink className='sub-nav-btn' to="/marketplace/sell">Sell items</NavLink >14            </div>15            <div className="marketplace-container">16                <div className="app-wrapper-container marketplace-container-outlet">17                    <Outlet context={[selectedItemId, setSelectedItemId]} />18                </div>19                <ItemStats id={selectedItemId} />20            </div>21        </div>22    )23}24
25export default MarketplacePageWrapper;
With the marketplace page wrapper ready, we can add it to the main navigation in the App.jsx.
1import MarketplacePageWrapper from './pages/Marketplace/MarketplacePageWrapper/MarketplacePageWrapper';2import MarketplaceItems from './pages/Marketplace/MarketplaceItems/MarketplaceItems';3
4const App = () => (3 collapsed lines
5 <HashRouter basename='/'>6 <AuthProvider>7 <UserMoneyProvider>8 <Routes>9 <Route path='/' element={<ProtectedRoute><Home /></ProtectedRoute>} >4 collapsed lines
10 <Route element={<LeaderboardPageWrapper />} >11 <Route index element={<Rankings />} />12 </Route>13 <Route path="inventory" element={<Inventory />} />14 <Route path="marketplace" element={<MarketplacePageWrapper />} >15 <Route index element={<MarketplaceItems />} />16 <Route path="sell" element={<MarketplaceItems />} />17 </Route>4 collapsed lines
18 <Route path="friends" element={<FriendsPageWrapper />} >19 <Route index element={<FriendsList />} />20 <Route path="add-friends" element={<AddFriends />} />21 </Route>22 </Route>3 collapsed lines
23 <Route path='/register' element={<Register />} />24 <Route path='/login' element={<Login />} />25 <Route path='/totp' element={<Totp />} />26 </Routes>3 collapsed lines
27 </UserMoneyProvider>28 </AuthProvider>29 </HashRouter>30);Each subroute of the marketplace directs to the MarketplaceItems component, which will render different data depending on whether the user is buying or selling. This is easily managed by retrieving the active route (either /marketplace or /marketplace/sell).
Displaying items in the marketplace
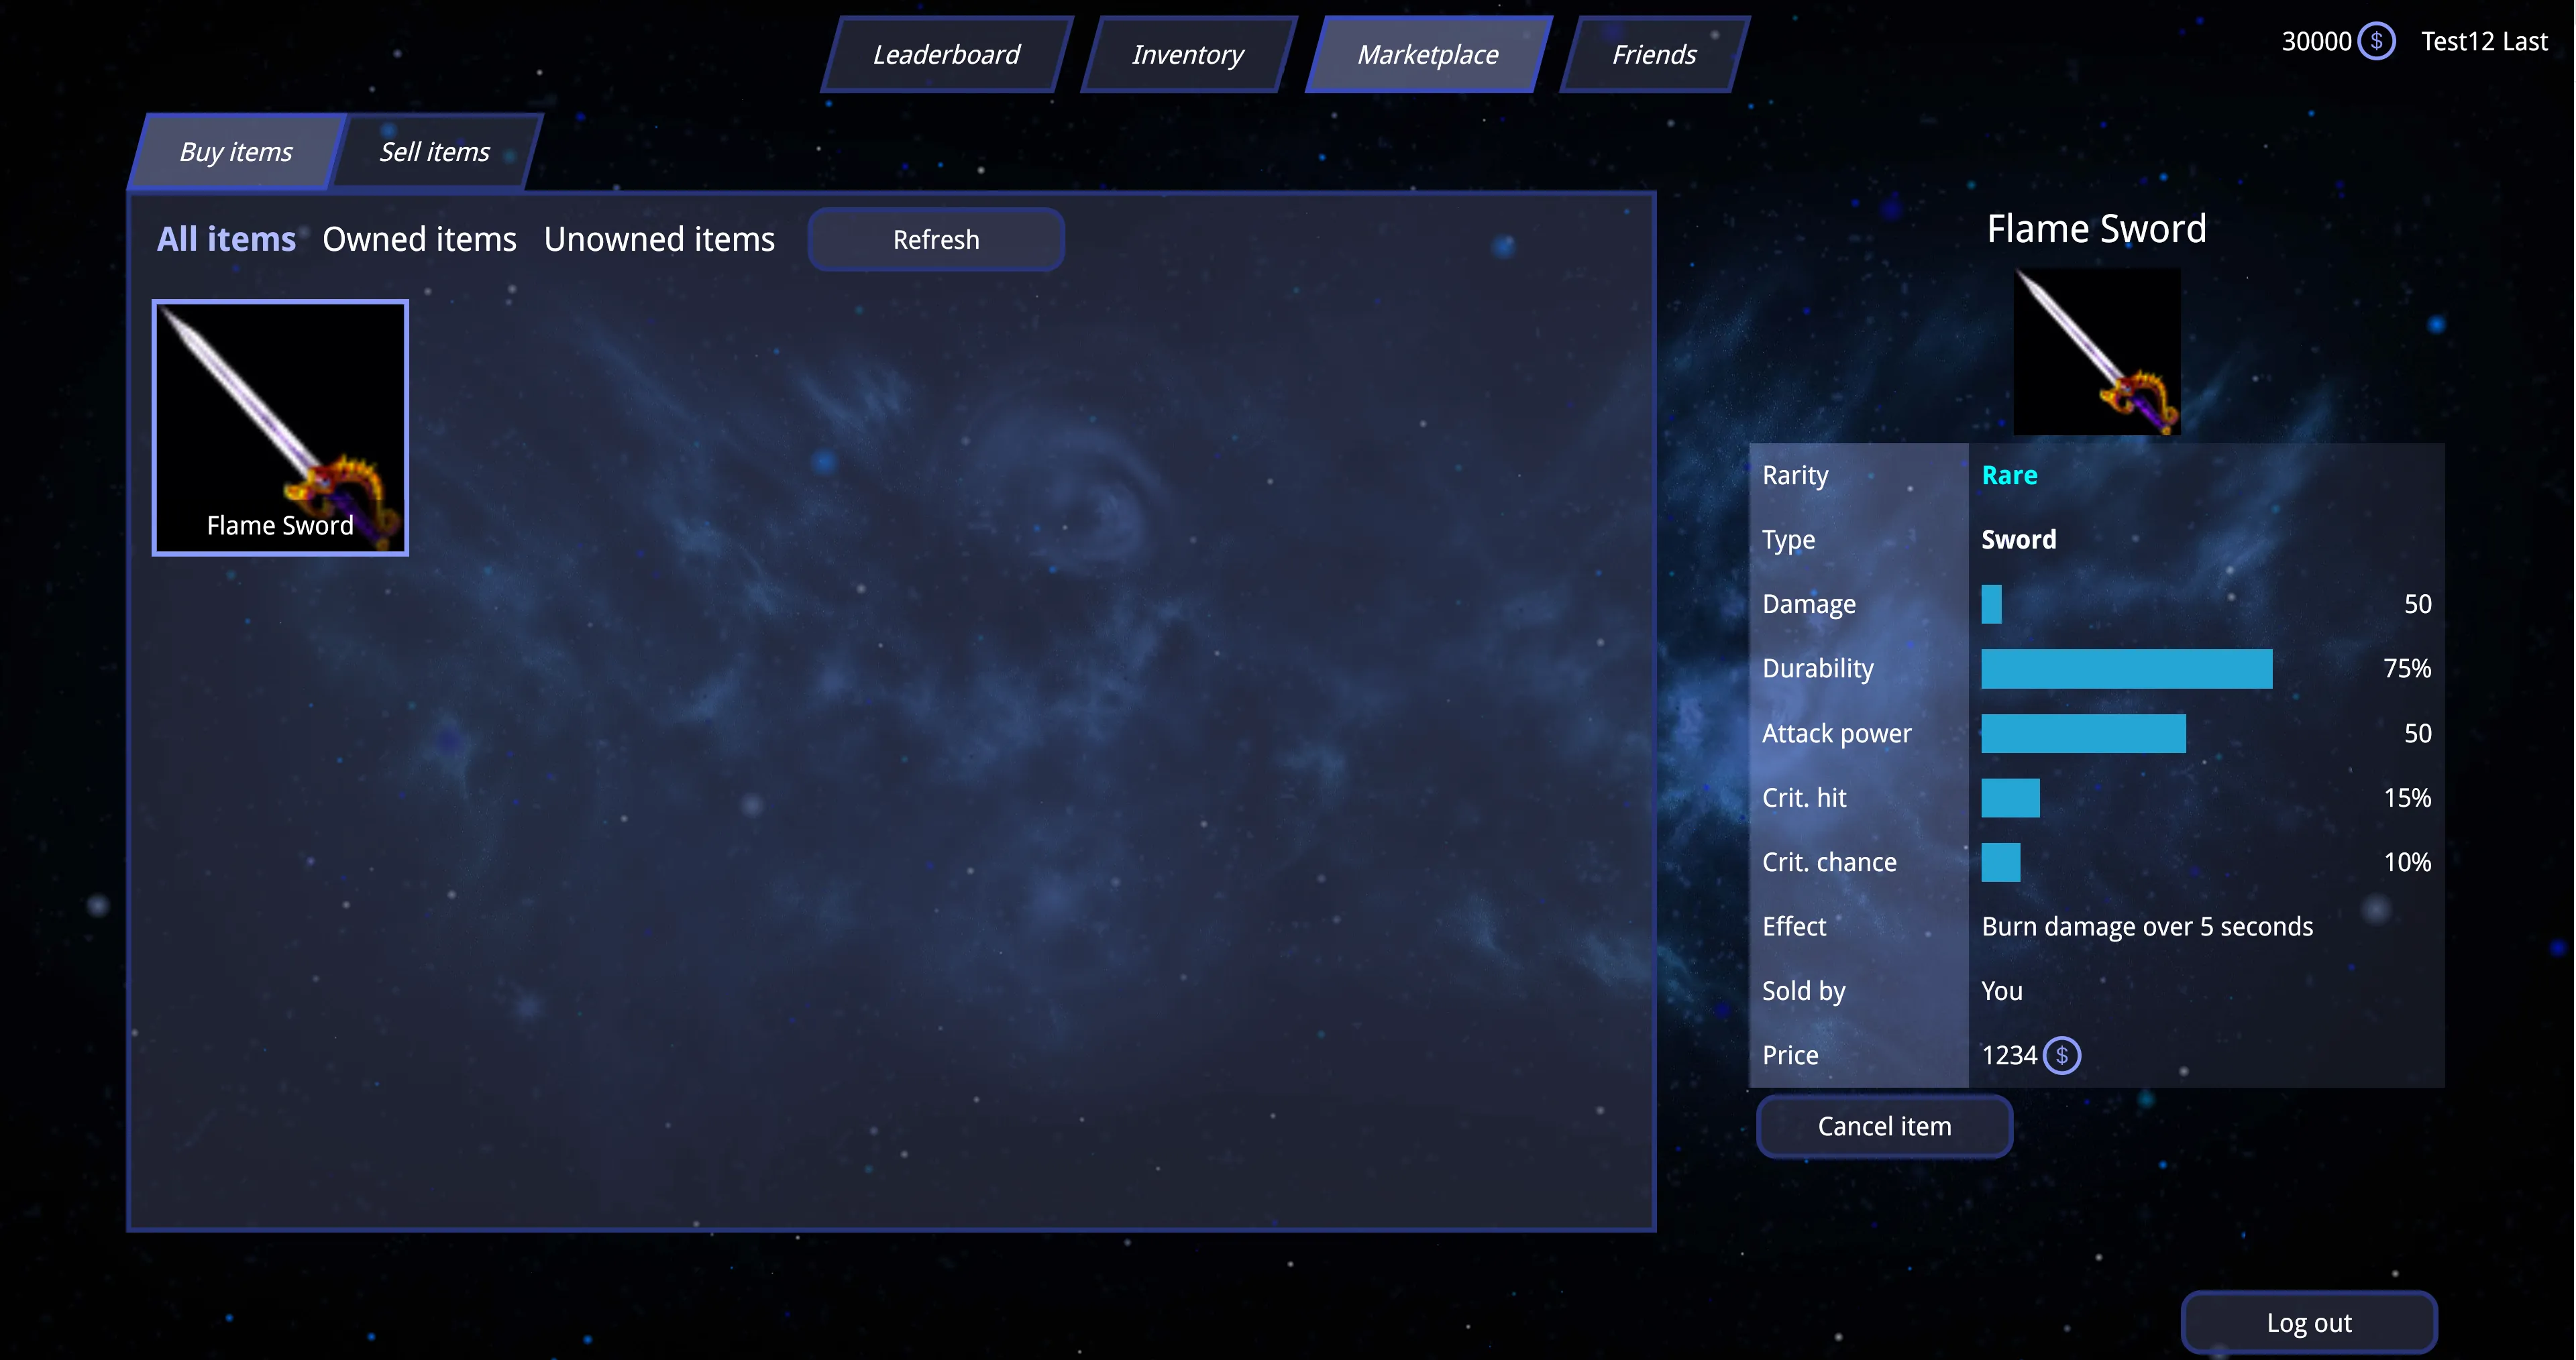
To display items on the marketplace page, we’ll create a MarketplaceItems component. We’ll start by fetching items that are either for sale or can be sold by the user, depending on the active route. The route will determine whether the component shows items for buying or selling. Using the pathname property from the useLocation hook, we can check the route and define a memoized variable using useMemo based on the route.
1import { useLocation } from 'react-router-dom';2
3const MarketplaceItems = () => {4    const { pathname } = useLocation();5
6    const displayItemsForSale = useMemo(() => {7        return pathname.endsWith('/sell');8    }, [pathname]);9}
With the displayItemsForSale variable, we can now fetch the appropriate data. We’ll define state for the items and get the current user’s ID to fetch the correct items.
1import React, { useCallback, useEffect, useMemo, useState } from 'react';2import { useLocation } from 'react-router-dom';3
4const MarketplaceItems = () => {5    const [user] = useLocalStorage('user');6    const [itemsData, setItemsData] = useState([]);7    const [fetch, loading] = useFetch();8    const { pathname } = useLocation();9
10    const displayItemsForSale = useMemo(() => {11        return pathname.endsWith('/sell');12    }, [pathname]);13
14    const updateItemsList = useCallback(async () => {15        const requestUrl = displayItemsForSale ?16            `${process.env.SERVER_URL}/api/users/${user.id}/items-for-sale` :17            `${process.env.SERVER_URL}/api/items/for-sale`;18
19        const [xhr, error] = await fetch('GET', requestUrl);20        if (error) return console.error(error);21
22        const items = JSON.parse(xhr.responseText);23        setItemsData(items);24    }, [pathname]);25
26    useEffect(() => {27        updateItemsList();28    }, [updateItemsList]);29}
To render the itemsData, we’ll use a scrollable container and the ItemPreview component from the inventory implementation. A loader will be added until the data is fully loaded.
1const MarketplaceItems = () => {2    ...3    const [selectedItemId, setSelectedItemId] = useOutletContext();4
5    const openItemStats = useCallback((event) => {6        const next = event.currentTarget.dataset.id;7        setSelectedItemId(next);8    }, []);9
10    return (11        <>12            <Loader className="loader-container" visible={loading}></Loader>13            {!itemsData.length && !loading && <div className='items-container-wrapper-no-items'>{displayItemsForSale ? 'No items for sale' : 'There are no items'}</div>}14            <gameface-scrollable-container automatic class="items-container">15                <component-slot class="items-container-wrapper" data-name="scrollable-content">16                    {!loading && itemsData.map((item) => {17                        return <ItemPreview key={item._id}18                            id={item._id}19                            className={`${selectedItemId === item._id ? 'item-selected' : ''}`}20                            image={item.image}21                            name={item.name}22                            toggleItemStats={openItemStats}23                        />24                    })}25                </component-slot>26            </gameface-scrollable-container>27        </>28    )29}
Adding filters for buying items

In the marketplace, we’ll add three buttons to filter the items when a player wants to buy. These filters will be helpful for players to view all available items, see only the items they are selling, or browse items they don’t own and can purchase.
We begin by defining an enum variable for the filter types:
1const filterButtons = {2 all: 'All items',3 owned: 'Owned items',4 unowned: 'Unowned items'5}Next, we initialize the active filter state, with the default value set to display all items:
1const MarketplaceItems = () => {2 ...3 const [activeFilter, setActiveFilter] = useState(filterButtons.all);4 ...5}To fetch filtered items from the database, we need to adjust the URL queries based on the selected filter.
1const MarketplaceItems = () => {2 const getFilterUrlParam = useCallback(() => {3 switch (activeFilter) {4 case filterButtons.owned: return '?filterUserItems=true';5 case filterButtons.unowned: return '?filterWithoutUserItems=true';6 default:7 case filterButtons.all: return '';8 }9 }, [activeFilter]);10
11 const updateItemsList = useCallback(async () => {12 setSelectedItemId('');13 const requestUrl = displayItemsForSale ?14 `${process.env.SERVER_URL}/api/users/${user.id}/items-for-sale` :15 `${process.env.SERVER_URL}/api/items/for-sale`;16 `${process.env.SERVER_URL}/api/items/for-sale${getFilterUrlParam()}`;6 collapsed lines
17
18 const [xhr, error] = await fetch('GET', requestUrl);19 if (error) return console.error(error);20
21 const items = JSON.parse(xhr.responseText);22 setItemsData(items);23 }, [pathname, getFilterUrlParam]);Now we can create filter buttons in the UI, along with a simple “Refresh” button to manually update the item list:
1const MarketplaceItems = () => {2 const filterItems = useCallback((event) => {3 const value = event.currentTarget.dataset.value;4 setActiveFilter(value);5 });6
7 return (8 <>9 <Loader className="loader-container" visible={loading}></Loader>10 {!loading && !displayItemsForSale &&11 <div className='items-container-wrapper-filters'>12 {Object.values(filterButtons).map((value) => {13 return <span key={value} onClick={filterItems} data-value={value} className={`items-container-wrapper-filters-item ${activeFilter === value ? 'items-container-wrapper-filter-active' : ''}`}>{value}</span>14 })}15 <button onClick={updateItemsList}>Refresh</button>16 </div>17 }14 collapsed lines
18 {!itemsData.length && !loading && <div className='items-container-wrapper-no-items'>{displayItemsForSale ? 'No items for sale' : 'There are no items'}</div>}19 <gameface-scrollable-container automatic class="items-container">20 <component-slot class="items-container-wrapper" data-name="scrollable-content">21 {!loading && itemsData.map((item) => {22 return <ItemPreview key={item._id}23 id={item._id}24 className={`${selectedItemId === item._id ? 'item-selected' : ''}`}25 image={item.image}26 name={item.name}27 toggleItemStats={openItemStats}28 />29 })}30 </component-slot>31 </gameface-scrollable-container>32 </>33 )34}Adding spatial navigation
As previously mentioned, we’ll incorporate spatial navigation into the marketplace page. This is especially convenient since we already created the useSpatialNavigation hook.
1import useSpatialNavigation from '../../../hooks/useSpatialNavigation';2
3const MarketplaceItems = () => {4    useSpatialNavigation(itemsData, '.item-preview');5}
Removing the item after purchase, sell, or cancellation
When an item is bought, sold, or canceled by the user, the item list should update. To avoid making an extra server request for the full item list, we can trigger a custom event to remove the item from the itemsData state. This custom event will be triggered by the BuyItemForm or SellItemForm components, which will be defined later.
1const MarketplaceItems = () => {2    const onRemoveItemFromList = useCallback((event) => {3        const itemId = event.detail;4
5        setItemsData((prev) => prev.filter((el) => el._id !== itemId));6        setSelectedItemId('');7    }, []);8
9    useEffect(() => {10        document.addEventListener('remove-item-from-list', onRemoveItemFromList);11        return (() => {12            document.removeEventListener('remove-item-from-list', onRemoveItemFromList);13        })14    }, []);15}
Adding new elements to the ItemStats component
Since the ItemStats component is used on both the inventory and marketplace pages, we need to add elements that allow users to sell, buy, or cancel items in the marketplace.
We’ll achieve this by checking the current route and conditionally rendering the BuyItemForm or SellItemForm components, which will be defined later.
1import { useLocation } from 'react-router-dom';2import { useLocalStorage } from '../hooks/useLocalStorage';3
4const ItemStats = ({ id }) => {5 const [user] = useLocalStorage('user');6 const { pathname } = useLocation();7 const [displayItemStatsForMarketplaceBuy, displayItemStatsForMarketplaceSell] = useMemo(() => {8 return [pathname.endsWith('/marketplace'), pathname.endsWith('/marketplace/sell')];9 }, [pathname]);10
11 return <div className={`item-stats-wrapper ${id ? 'item-stats-wrapper-visible' : ''}`}>12 <Loader className="item-stats-wrapper-loader" visible={loading}></Loader>13 <div className={`item-stats ${!id || loading ? 'item-stats-invisible' : ''}`}>14 {!itemData && 'Unable for fetch item data.'}15 {itemData && <>30 collapsed lines
16 <div className='item-stats-name'>{itemData.name}</div>17 <div className='item-stats-image' style={{ backgroundImage: `url(${process.env.SERVER_URL}/items/${itemData.image})` }}></div>18 <div className='item-stats-container'>19 <StatItem title="Rarity" showStat={itemData.rarity}>20 <RarityStatItem value={itemData.rarity} />21 </StatItem>22 <StatItem title="Type" showStat={itemData.type}>23 <RarityStatItem value={itemData.type} />24 </StatItem>25 <StatItem title="Armor" showStat={itemData.stats.armor}>26 <ProgressStatItem value={itemData.stats.armor} />27 </StatItem>28 <StatItem title="Damage" showStat={itemData.stats.damage}>29 <ProgressStatItem value={itemData.stats.damage} calculatedValue={itemData.stats.damage / MAX_DAMAGE * 100} />30 </StatItem>31 <StatItem title="Durability" showStat={itemData.stats.durability}>32 <ProgressStatItem value={itemData.stats.durability} inPercents={true} />33 </StatItem>34 <StatItem title="Attack power" showStat={itemData.stats.attackPower}>35 <ProgressStatItem value={itemData.stats.attackPower} />36 </StatItem>37 <StatItem title="Crit. hit" showStat={itemData.stats.criticalHit}>38 <ProgressStatItem value={itemData.stats.criticalHit} inPercents={true} />39 </StatItem>40 <StatItem title="Crit. chance" showStat={itemData.stats.criticalChance}>41 <ProgressStatItem value={itemData.stats.criticalChance} inPercents={true} />42 </StatItem>43 <StatItem title="Effect" showStat={itemData.stats.effect}>44 {itemData.stats.effect}45 </StatItem>46 {displayItemStatsForMarketplaceBuy &&47 <BuyItemForm48 itemId={id}49 itemPrice={itemData.price}50 soldByName={itemData.soldByName}51 soldById={itemData.soldById}52 currentUserId={user.id}53 />}54 {displayItemStatsForMarketplaceSell &&55 <SellItemForm user={user} itemId={id} />56 }57 </div>58 </>59 }60 </div>61 </div>62}BuyItemForm component
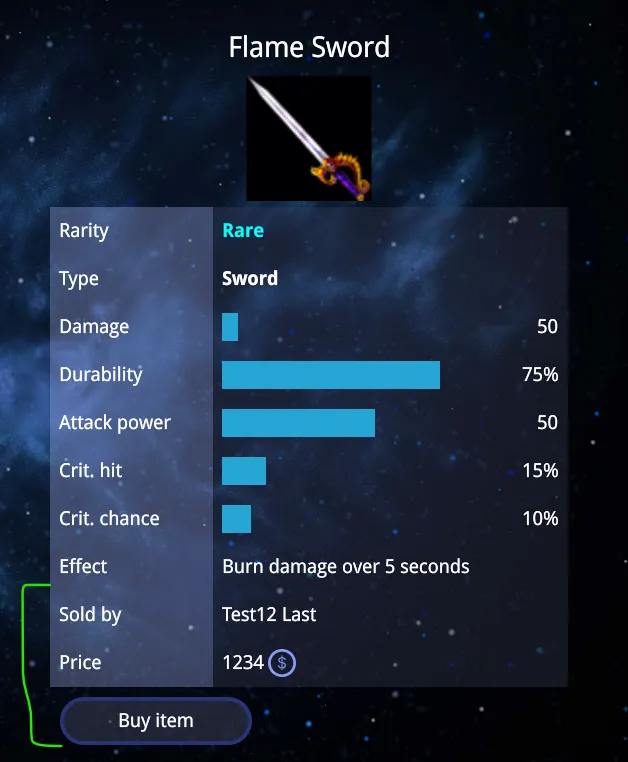
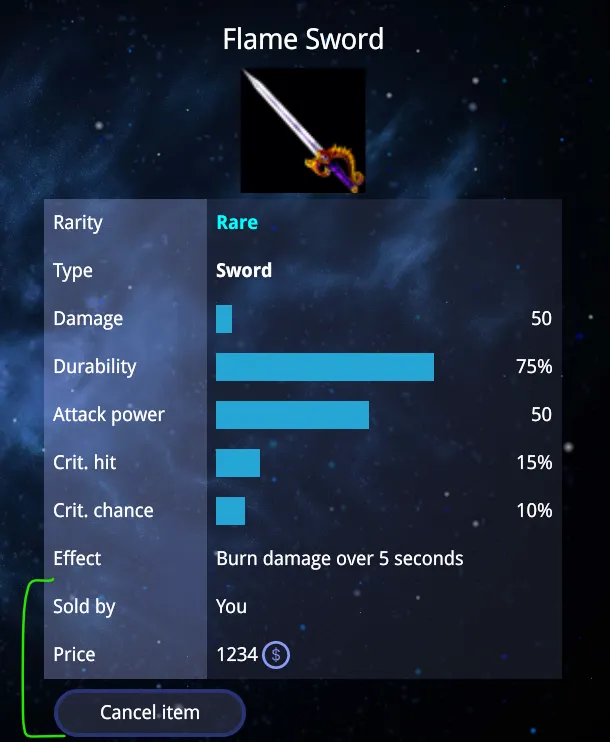
This component adds extra details to the item stats, such as:
- The seller’s name
- The item’s price
- Displays a warning if the user doesn’t have enough funds, using the
useUserMoneyhook created earlier.
- Displays a warning if the user doesn’t have enough funds, using the
- A button to either buy the item or cancel the sale (if the logged-in user is the seller).
- The
StatItemcomponent is reused to keep the layout consistent with theItemStatscomponent.
1import React, { useCallback } from 'react';2import { useUserMoney } from '../hooks/useUserMoney';3import { StatItem } from './StatItem';4import useFetch from '../hooks/useFetch';5
6const BuyItemForm = ({ itemId, itemPrice, soldByName, soldById, currentUserId }) => {7 const { userMoney } = useUserMoney();8 const [fetch] = useFetch();9
31 collapsed lines
10 const onBuyItem = useCallback(async () => {11 const [, error] = await fetch('POST', `${process.env.SERVER_URL}/api/items/${itemId}/buy`);12 if (error) return console.error(error);13 document.dispatchEvent(new CustomEvent('remove-item-from-list', { detail: itemId }));14 }, [itemId]);15
16 const onCancelItem = useCallback(async () => {17 const [, error] = await fetch('POST', `${process.env.SERVER_URL}/api/items/${itemId}/cancel`);18 if (error) return console.error(error);19 document.dispatchEvent(new CustomEvent('remove-item-from-list', { detail: itemId }));20 }, [itemId]);21
22 return <>23 <StatItem title="Sold by" showStat={true}>24 {currentUserId !== soldById ? soldByName : 'You'}25 </StatItem>26 {currentUserId !== soldById && <>27 <StatItem title="Price" showStat={itemPrice}>28 {itemPrice}29 <div className='app-user-data-money-icon'></div>30 {userMoney < itemPrice && <b style={{ color: 'red', marginLeft: '0.5vw' }}>Not enough money!</b>}31 </StatItem>32 <button onClick={onBuyItem} className={userMoney < itemPrice ? 'btn-disabled' : ''}>Buy item</button>33 </>}34 {currentUserId === soldById && <>35 <StatItem title="Price" showStat={itemPrice}>36 {itemPrice}<div className='app-user-data-money-icon'></div>37 </StatItem>38 <button onClick={onCancelItem}>Cancel item</button>39 </>40 }41 </>42}43
44export default BuyItemForm;SellItemform component
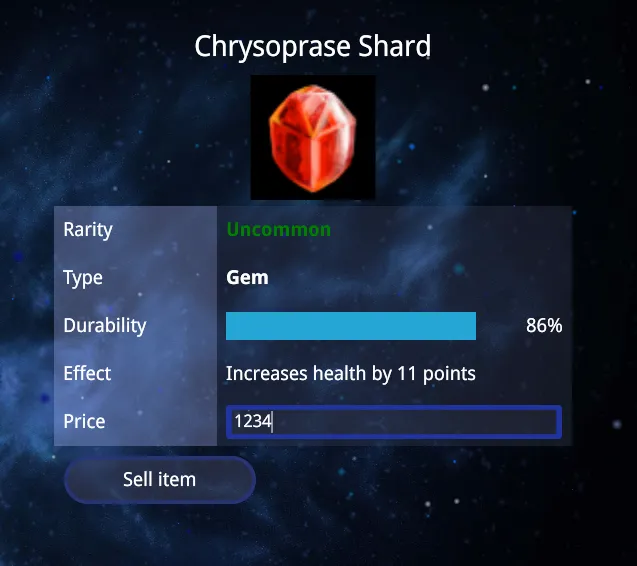
This component enables users to sell items on the marketplace.
We also use the gameface-text-field component for creating a numeric input field for the item’s price, as Gameface doesn’t natively support number inputs. This component restricts input to numbers.
1import React, { useCallback, useEffect, useRef, useState } from 'react';2import 'coherent-gameface-text-field';3import 'coherent-gameface-text-field/style.css';4import { StatItem } from './StatItem';5import './SellItemForm.scss';6import useFetch from '../hooks/useFetch';7
8const SellItemForm = ({ user, itemId }) => {9 const [sellBtnEnabled, setSellBtnEnabled] = useState(false);31 collapsed lines
10 const textFieldRef = useRef(null);11 const [fetch] = useFetch();12
13 const toggleSellButton = useCallback((event) => {14 setSellBtnEnabled(!!event.target.value);15 }, []);16
17 useEffect(() => {18 textFieldRef.current.addEventListener('input', toggleSellButton);19 }, []);20
21 const onSellItem = useCallback(async (price) => {22 const [, error] = await fetch('POST', `${process.env.SERVER_URL}/api/items/${itemId}/sell`, {23 price,24 soldByName: `${user.firstName} ${user.lastName}`,25 soldById: user.id,26 });27 if (error) return console.error(error);28 document.dispatchEvent(new CustomEvent('remove-item-from-list', { detail: itemId }));29 }, [user, itemId]);30
31 const sellItem = useCallback(() => {32 onSellItem(textFieldRef.current.value);33 textFieldRef.current.value = '';34 setSellBtnEnabled(false);35 }, [onSellItem]);36
37 return <>38 <StatItem title="Price" showStat={true}>39 <gameface-text-field ref={textFieldRef} class="price-input" type="number" max="10000" min="0" control-disabled></gameface-text-field>40 </StatItem>41 <button onClick={sellItem} className={sellBtnEnabled ? '' : 'btn-disabled'}>Sell item</button>42 </>43}44
45export default SellItemForm;Notify active users for item purchases
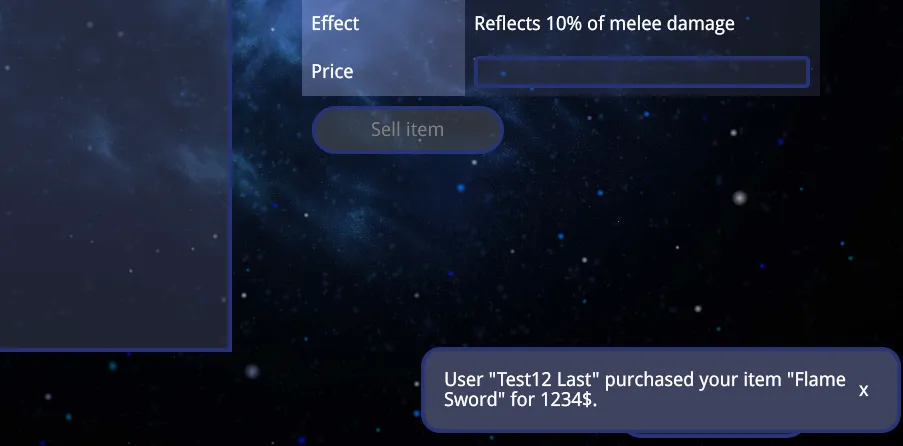
To keep players informed when one of their items is purchased in the marketplace, we’ll add a toast notification for users who are online. This ensures that players are immediately notified when a transaction occurs.
For this, we’ll use the gameface-toast component.
The toast notification will be triggered when the server emits a server-notification-message socket event, which will be handled by the frontend. We’ll subscribe to this event on the home page.
1import React, { useCallback, useEffect } from 'react';2import React, { useCallback, useEffect, useRef } from 'react';3
4const Home = () => {5    const toastRef = useRef(null);6
7    const onNotificationMessage = useCallback((value) => {8        toastRef.current.message = value;9        toastRef.current.show();10    });11
12    const toggleSocketEvents = useCallback((watch) => {13        socket[watch ? 'on' : 'off']('user-money-changed', onUserMoneyChanged);14        socket[watch ? 'on' : 'off']('server-notification-message', onNotificationMessage);15    }, []);16    ...17}
Next, we render the gameface-toast component:
1import 'coherent-gameface-toast';2import 'coherent-gameface-toast/style.css';3
4const Home = () => {5 return (21 collapsed lines
6 <div className="app">7 {user && <div className='app-user-data'>8 <div className='app-user-data-money'>9 {userMoney}10 <div className='app-user-data-money-icon'></div>11 </div>12 {user.firstName} {user.lastName}13 </div>}14 <AnimatedBackground></AnimatedBackground>15 <div className='app-wrapper-navigation'>16 <NavLink className='nav-btn' to="/">Leaderboard</NavLink >17 <NavLink className='nav-btn' to="/inventory">Inventory</NavLink >18 <NavLink className='nav-btn' to="/marketplace">Marketplace</NavLink >19 <NavLink className='nav-btn' to="/friends">Friends</NavLink >20 </div>21 <div className='app-wrapper'>22 <Outlet />23 </div>24 <div className='app-footer'>25 <button className='app-logout-btn' onClick={onLogout}>Log out</button>26 </div>27 <gameface-toast ref={toastRef} position="bottom-right" class="app-toast" timeout="10000">28 <div slot="message">Message</div>29 <div slot="close-btn">x</div>30 </gameface-toast>31 </div>32 )33}Resources
For the item icons, we used the free Basic RPG Item Icons from this resource.